


A React Native video call lets two or more mobile users exchange real-time audio and video over WebRTC. VideoSDK provides a rooms-based React Native SDK that handles signaling, STUN/TURN negotiation, and media routing, so you can embed sub-300 ms video calling without managing infrastructure. Start with the VideoSDK React Native quickstart to ship a working call in minutes.
Building a React Native video call used to mean wrestling with raw WebRTC peer connections, signaling servers, and TURN infrastructure before you could even render a single frame. In 2026, developers shipping telehealth apps, tutoring platforms, and social video products expect sub-second latency, background noise suppression, and call recording out of the box. This guide walks you through a production-ready React Native video call using VideoSDK, from architecture and permissions to advanced features and deployment. By the end, you will understand every moving part and how to wire them together with the VideoSDK React Native SDK.
What Is a React Native Video Call?
A React Native video call is a real-time, peer-to-peer or multi-party audio and video session embedded inside a cross-platform mobile application built with React Native. The underlying transport protocol is WebRTC, which handles media capture, encoding, transmission, and decoding across devices. VideoSDK wraps this complexity into a rooms-based architecture where participants join a shared Room, publish their camera and microphone streams, and subscribe to streams from other participants.
VideoSDK provides this capability through its dedicated React Native package, which exposes hooks and components that abstract away the raw WebRTC layer. Instead of managing peer connections, ICE candidates, and SDP offers manually, you interact with high-level concepts like Rooms, Participants, and Streams. The SDK handles network traversal, codec negotiation, and media routing through VideoSDK's cloud SFU (Selective Forwarding Unit), delivering sub-300 ms latency for most real-world scenarios. This makes a React Native video call built with VideoSDK suitable for telehealth consultations, live tutoring, customer support, and social apps where latency directly impacts user experience.
Core Architecture of a VideoSDK Video Call
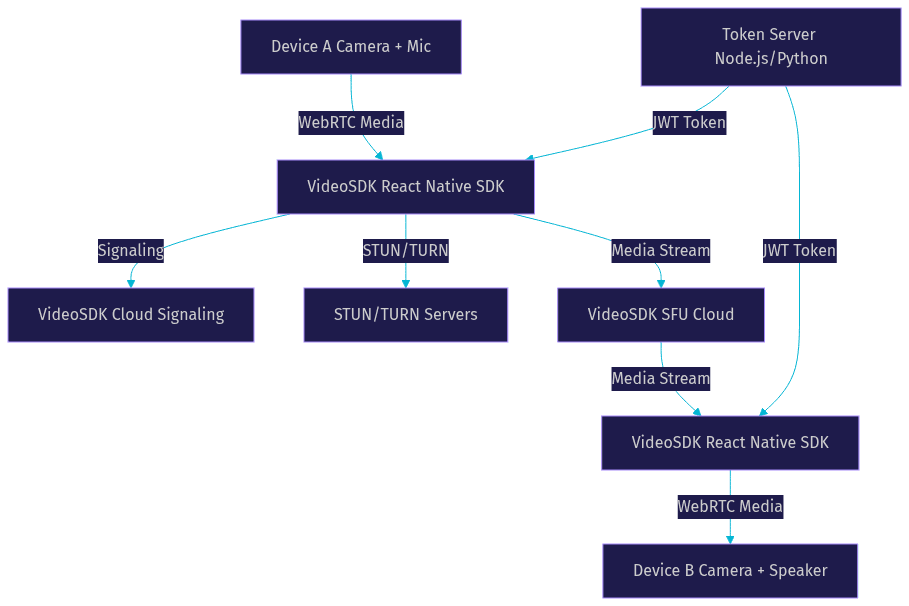
Every React Native video call powered by VideoSDK relies on four interconnected components working in concert. Understanding these pieces is essential before you build, because production issues almost always trace back to one of them.
The first component is signaling. Signaling is the exchange of session control messages between devices and the VideoSDK cloud, coordinating who joins, who leaves, and how media should flow. VideoSDK manages signaling internally through its SDK, so you never write a signaling server yourself.
The second component is STUN (Session Traversal Utilities for NAT). STUN servers help devices discover their public IP addresses when they sit behind NAT routers, which is the case for nearly every mobile device on a cellular or home network. Without STUN, devices cannot establish direct peer connections.
The third component is TURN (Traversal Using Relays around NAT). When direct peer-to-peer connections fail due to restrictive firewalls, symmetric NATs, or corporate network policies, TURN servers relay media traffic. VideoSDK includes TURN infrastructure, which is critical for cellular networks where P2P fails roughly 20 to 30 percent of the time depending on carrier conditions.
The fourth component is media routing through VideoSDK's SFU. Instead of mesh networks where every participant sends media to every other participant (which scales poorly), the SFU receives each participant's stream once and forwards it to all other participants. This keeps bandwidth usage linear rather than exponential as participant count grows.
The Role of Rooms, Participants, and Streams in a React Native Video Call
In VideoSDK's architecture, a Room is the virtual meeting space identified by a unique room ID. Participants are the users or AI agents connected to that Room, each with their own audio and video tracks. Streams are the actual media payloads, audio and video, that participants publish and subscribe to within the Room. The React Native SDK exposes these entities through hooks, giving you direct access to participant lists, stream states, and real-time events.
Choosing the Right Video SDK for a React Native Video Call
When building a React Native video call, you face a choice between raw WebRTC libraries and commercial SDKs. Raw libraries like react-native-webrtc give you maximum control but require you to build signaling, STUN/TURN provisioning, codec management, and media routing from scratch. For most teams, this means months of infrastructure work before reaching feature parity with a commercial offering.
Commercial SDKs abstract this complexity. VideoSDK, Stream, and MirrorFly all offer React Native video calling packages, but they differ in latency, platform coverage, and built-in features. VideoSDK stands out for React Native video call development because it delivers sub-300 ms latency through its optimized SFU, supports 10+ platforms beyond React Native (including iOS, Android, Flutter, and Unity), and includes built-in recording, transcription, screen sharing, and virtual backgrounds without additional integrations. The Prebuilt UI Kit lets you embed a fully functional video call interface with zero custom UI code, which is ideal for prototyping or MVPs. For production apps requiring custom branding, the SDK's hooks give you full control over rendering and controls.
Setting Up the Development Environment for Your React Native Video Call
Before writing any call logic, you need a properly configured React Native development environment. You should have React Native CLI installed, along with Xcode for iOS builds and Android Studio for Android builds. Node.js version 18 or higher is recommended for compatibility with the VideoSDK React Native package.
The setup process involves adding the VideoSDK React Native package to your project as a dependency, then linking the native modules that bridge WebRTC functionality to the iOS and Android runtimes. For iOS, this includes running the standard CocoaPods installation step to pull in native WebRTC binaries. For Android, the Gradle configuration automatically handles native library inclusion. After installation, you verify the link succeeded by checking that the SDK's native modules are accessible from the JavaScript layer. The VideoSDK React Native quickstart documents the exact installation steps for current SDK versions.
Configuring Platform Permissions for a React Native Video Call
A React Native video call cannot access cameras or microphones without explicit platform-level permissions. On iOS, you must add privacy usage description strings to your Info.plist file, explaining why your app needs camera and microphone access. These strings are mandatory, and Apple will reject apps that omit them.
On Android, you declare camera and microphone permissions in the AndroidManifest.xml file. Because Android 6.0 and later require runtime permission requests, your React Native code must prompt the user to grant these permissions before the video call begins. The VideoSDK React Native SDK provides helper methods to check and request permissions, but you should also handle the case where a user denies access. A common pattern is to show a non-blocking explanation of why the permission is needed, then re-prompt. If the user permanently denies, route them to app settings. Failing to handle permission denial gracefully is one of the most common reasons React Native video call apps crash in production.
Authenticating Users and Generating Meeting Tokens for Your React Native Video Call
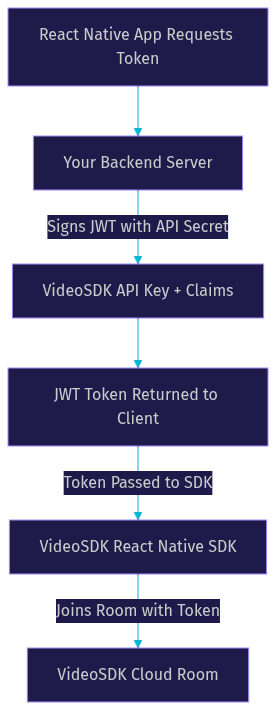
VideoSDK uses token-based authentication to secure every React Native video call. You generate a JWT token server-side using your VideoSDK API key and secret, then pass that token to the React Native SDK on the client. Never expose your API secret in the mobile app itself, as it can be extracted from compiled binaries.
The token generation flow works as follows. Your backend server receives a request from the React Native app for a meeting token. The server constructs a JWT payload containing your VideoSDK API key, an expiration timestamp, and optional claims like participant role or room ID scoping. The server signs this JWT with your API secret and returns it to the client. The React Native SDK then uses this token when joining a Room. Tokens typically expire after a set duration, so for long calls you may need to implement a refresh mechanism. The VideoSDK authentication guide covers the exact token structure and claims.
Building the Call UI for Your React Native Video Call
Using the Prebuilt UI Kit for a React Native Video Call
VideoSDK offers a Prebuilt UI Kit that lets you embed a complete React Native video call interface without writing custom UI code. You configure the Prebuilt component with your meeting ID, participant name, and token, and it renders a full-featured call screen with participant grids, mute controls, camera toggle, screen share, and end-call buttons.
This approach is ideal when you need a working React Native video call quickly, such as for an MVP or a proof of concept. The Prebuilt UI Kit handles layout management, active speaker detection, and participant join/leave animations automatically. You can customize colors and branding to match your app's design system. When your product requirements eventually demand a fully custom interface, you can transition to the SDK's hooks-based approach without changing your backend or room management logic. Learn more about the Prebuilt SDK.
Custom UI with Hooks for a React Native Video Call
For production apps that need a branded, custom React Native video call interface, VideoSDK provides two primary hooks. The useMeeting hook manages the meeting lifecycle, giving you access to the join method, leave method, participant list, active speaker ID, and meeting state. The useParticipant hook gives you granular access to each participant's audio and video streams, mute status, and connection quality.
To render video, you map over the participant list from useMeeting and for each participant, you access their video stream through useParticipant. You then render each stream using the RTCView component provided by the underlying WebRTC layer. The SDK handles stream attachment and rendering internally, so you focus on layout and user experience.
Active speaker detection is built into the SDK. The useMeeting hook exposes the current active speaker's participant ID, which you use to highlight or enlarge the speaking participant's video tile. For call controls, you wire buttons to the mute, unmute, camera toggle, and camera switch methods exposed by useMeeting. The end-call action calls the leave method, which cleanly disconnects the participant and tears down all media tracks. This hooks-based approach gives you full control over the React Native video call UI while the SDK handles all media and networking complexity.
Advanced Features You Can Add to Your React Native Video Call
Screen Sharing and Custom Video Tracks in a React Native Video Call
Screen sharing lets participants broadcast their device screen as an additional video stream within the React Native video call. VideoSDK supports screen sharing on both iOS and Android through custom video tracks. Custom video tracks also enable processed video feeds, such as filtered camera input or canvas-based overlays, to be sent alongside or instead of the raw camera feed. The SDK handles track lifecycle, publishing, and subscription automatically.
Real-time Transcription and Recording for Your React Native Video Call
VideoSDK includes built-in recording and transcription for React Native video calls. You can start and stop recording programmatically through the SDK or REST API, and recordings are stored in VideoSDK's cloud with optional custom storage destinations. Real-time transcription converts spoken audio to text during the call, which is valuable for accessibility, compliance, and post-call summaries. The VideoSDK transcription docs detail configuration options.
Breakout Rooms and Waiting Rooms in a React Native Video Call
Breakout rooms let you split a React Native video call into smaller sub-groups, which is useful for workshops, classrooms, and large team meetings. Waiting rooms let you gate participants before they join the main call, giving hosts control over who enters and when. Both features are managed through the SDK's meeting methods and role-based access control.
Virtual Backgrounds and Noise Suppression for Your React Native Video Call
Virtual backgrounds replace a participant's real background with an image or blur effect, which is important for professional calls in uncontrolled environments. Noise suppression filters out non-speech audio like keyboard typing, fan noise, and traffic. Both features are built into the VideoSDK React Native SDK and can be toggled per participant without additional libraries.
Production-Ready Considerations for Your React Native Video Call
Shipping a React Native video call to production requires handling scenarios that localhost testing never surfaces. TURN server selection matters because cellular networks in different regions have varying NAT configurations. VideoSDK's global TURN infrastructure automatically routes traffic to the nearest relay, but you should verify geo-fencing settings match your compliance requirements if you need to restrict traffic to specific regions.
Network-adaptive streaming is critical for mobile. VideoSDK automatically adjusts bitrate and resolution based on real-time bandwidth detection, downscaling video when a user drops from WiFi to cellular. This prevents frozen video and audio-only degradation that would otherwise cause users to abandon the call. You should test this behavior by throttling network conditions in your development environment.
End-to-end encryption (E2EE) ensures that media content is encrypted on the device and only decrypted by the intended recipient. VideoSDK supports E2EE for React Native video calls, which is essential for telehealth and legal consultations. Enable it at the Room level during creation.
Handling reconnections gracefully is what separates a demo from a production app. When a participant's network drops, the VideoSDK SDK attempts automatic reconnection. Your UI should reflect this state, showing a reconnecting indicator rather than dropping the participant's tile. If reconnection fails after a timeout, clean up the participant's resources and notify the user. VideoSDK's analytics dashboard provides post-call metrics on reconnection events, packet loss, and bitrate trends, which you use to monitor quality across your user base. For scaling beyond two participants, the SFU architecture handles the media routing, but you should test with your expected participant count to validate UI performance on lower-end devices.
Common Pitfalls and Troubleshooting in a React Native Video Call
Several issues recur in React Native video call development. Token expiry causes sudden disconnections, so implement token refresh logic for calls lasting longer than your token's lifetime. ICE failures on cellular networks manifest as one-way audio or frozen video, and they usually indicate TURN relay is needed but not being selected. VideoSDK handles TURN fallback automatically, but verify your Room configuration allows it.
Permission denials on Android often occur because the runtime permission prompt was skipped or the user selected "Don't ask again." Always check permission status before joining a Room and provide a clear path to app settings if denied. Background and kill-state handling is the hardest problem in mobile video calling. When the app moves to background, iOS suspends WebRTC connections. For incoming call notifications, integrate CallKeep to display the native iOS call UI, and use Firebase push notifications to wake the app on Android. The VideoSDK community on Discord and GitHub provides additional troubleshooting support.
Real-World Example: Telehealth Consultation React Native Video Call
Consider a healthcare startup building a telemedicine app with a React Native video call powered by VideoSDK. Patients join a waiting room before being admitted by the doctor. The call uses E2EE for HIPAA compliance, real-time transcription for medical record generation, and network-adaptive streaming to handle patients on rural cellular connections.
In this scenario, the doctor's app renders a custom UI using the useMeeting and useParticipant hooks, showing the patient's video in a large tile and their own preview in a picture-in-picture window. Screen sharing lets the doctor display lab results. After the call, the recording and transcription are available through the VideoSDK REST API for the patient portal. The startup reports sub-300 ms latency on WiFi and graceful degradation to audio-only on poor connections, with automatic reconnection recovering 90 percent of dropped sessions within five seconds. This is the kind of end-to-end experience VideoSDK enables without custom WebRTC engineering.
Definitions Glossary
Room: A virtual meeting space in VideoSDK identified by a unique room ID where participants exchange audio and video streams during a React Native video call.
Participant: A user or AI agent connected to a VideoSDK Room, with their own audio and video tracks accessible through the React Native SDK's hooks.
Stream/Track: The audio or video media payload published by a participant in a VideoSDK Room, rendered on the client through RTCView components.
Meeting Token: A JWT generated server-side using your VideoSDK API key and secret, authenticating a participant's access to a Room in a React Native video call.
SFU (Selective Forwarding Unit): VideoSDK's media routing server that receives each participant's stream once and forwards it to all others, keeping bandwidth usage linear as participant count grows.
Prebuilt UI Kit: VideoSDK's drop-in video calling interface component that renders a fully functional React Native video call screen with zero custom UI code.
Network-Adaptive Streaming: VideoSDK's automatic adjustment of video bitrate and resolution based on real-time bandwidth detection, preventing frozen video on poor mobile connections.
Key Takeaways
- A React Native video call built with VideoSDK abstracts WebRTC complexity into Rooms, Participants, and Streams, letting you focus on UX rather than signaling and ICE negotiation.
- Token-based authentication is mandatory and must be generated server-side to protect your API secret from mobile app extraction.
- The Prebuilt UI Kit ships a working React Native video call in minutes, while hooks like useMeeting and useParticipant enable fully custom branded interfaces.
- Production readiness requires TURN fallback, network-adaptive streaming, E2EE, reconnection handling, and analytics monitoring that VideoSDK provides out of the box.
- Advanced features including recording, transcription, screen sharing, virtual backgrounds, and breakout rooms are built into the SDK without additional integrations.
Conclusion
Building a production-grade React Native video call no longer requires months of WebRTC engineering. VideoSDK's React Native SDK handles signaling, STUN/TURN, media routing, and advanced features like recording and transcription, so you can ship a telehealth, tutoring, or social video app with sub-300 ms latency. Start with the VideoSDK React Native quickstart, grab your free tier at app.videosdk.live/login, and explore code samples for working examples. What are you building with VideoSDK? Drop a comment below, I would love to hear what kind of React Native video call use case you are working on.
Free $20 Balance for AI Voice Agents & Video Calls
FAQ