


A watch party API combines three parts: a real-time room that carries everyone's camera and microphone, a shared video source, and a signalling channel that broadcasts play, pause and seek events with a timestamp. Each viewer's player applies those events and corrects its own drift, so the group sees the same moment together.
This guide is for developers adding co-watching to their own product with a watch party API, not for anyone choosing a consumer watch together app to install. It compares three architectures, sets out the sync arithmetic (clock offset, drift correction, late joiners and browser autoplay rules), and builds the room with the VideoSDK React software development kit (SDK).
What is a watch party API?
A watch party API is the set of calls that lets a group watch one video at the same moment while they see and hear each other. The room carries faces and voices over Web Real-Time Communication (WebRTC). The player shows the video; in the design this guide builds, every viewer's player fetches the file itself from a content delivery network (CDN). The sync channel carries small control messages, so a pause on one screen becomes a pause on every screen.
Other platforms use a similar model: Google Meet's Co-Watching API guide has apps call notifyPauseState() and notifySeekToTimestamp() when a user changes playback, though Google offered that API only through an Early Access Program that is now closed to new signups.
Three ways to architect co-watching
The three co-watching architectures differ in where the video is decoded, and that decides how sync works.
| Architecture | Who plays the video | How sync works | Best for | Main limit |
|---|---|---|---|---|
| Local playback plus sync | Every viewer's own player | Control messages plus per-client drift correction | Small groups, licensed files | You write and tune the sync logic |
| Host screen share | Only the host | Everyone sees the host's shared frames | Quick demos, content with no API | Viewers watch a re-encoded capture of the host's screen |
| Broadcast | A server-side mix, sent as a stream | Viewers share the stream's delay | Large audiences | Viewers watch after the stream's delivery delay |
Local playback gives each viewer full-quality video while the room carries only faces, voices and small control messages, which is why this guide builds it. Screen share needs no sync code; the screen share tutorial for React video calls covers it. Broadcast suits a host talking over a film to a crowd: see how to build a host-and-audience live stream in React, and how WebRTC and HTTP Live Streaming (HLS) differ on latency and scale.
Whichever design you pick, showing a title to a group is also a licensing question for whoever manages your content agreements.
How do you keep video playback in sync across viewers?
You keep playback in sync by making one client the leader and having every other client follow its messages. The leader sends an action (play, pause or seek), the video position in seconds read from currentTime on the HTML media element (MDN), and the time it sent the message.
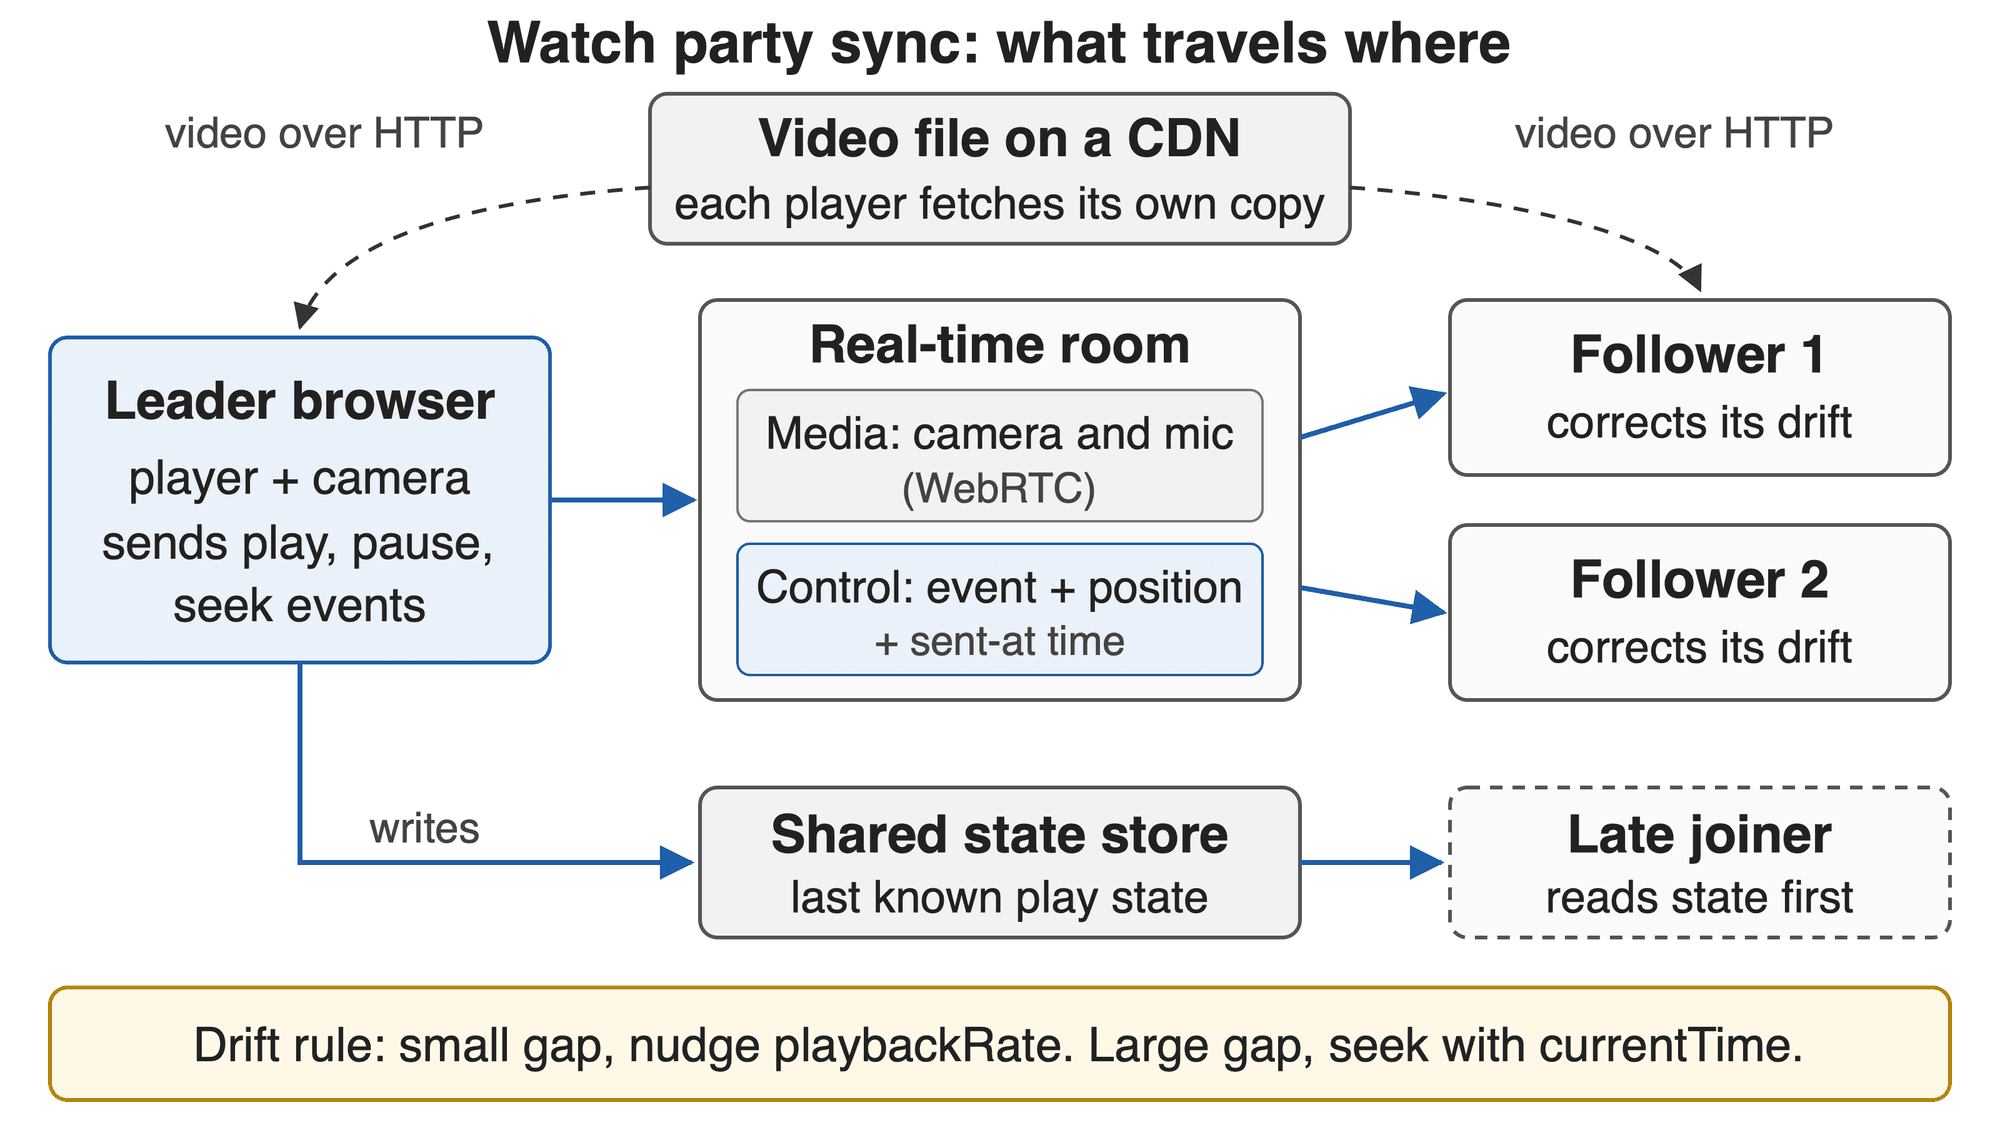
Each player streams the video file itself; the room carries faces, voices and small control messages, and a shared store holds the last state for late joiners.
When the leader is playing, a follower's target is the sent position plus the time elapsed since sending. For example, if the message says "play from 754.2 seconds" and the follower's corrected clock reads 0.35 seconds after the sent-at time, the follower plays from 754.55 seconds.
The follower's clock must be corrected first, because the sent-at time comes from the leader's clock, which can differ from the follower's. RFC 5905 (Network Time Protocol, NTP) estimates the offset from four timestamps as ((T2 - T1) + (T3 - T4)) / 2; run the same ping and reply over your sync channel when a viewer joins.
Players then drift apart during playback. Close a small gap by setting playbackRate slightly above or below 1.0; the MDN playbackRate reference notes that browsers correct audio pitch by default. Close a large gap with a seek by writing currentTime, and wait for the seeked event before measuring again. Base each measurement on several readings, because the MDN currentTime reference describes the value as an approximation whose update frequency depends on the browser.
Late joiners read the last known state before their first play. Browsers also block audible playback until the user interacts with the page: the MDN autoplay guide says play() then rejects with NotAllowedError, and Chrome's autoplay policy allows sound after a click or tap on the site. Start the player from the join click, or show a "tap to sync" button.
How to build a watch party app with the React SDK
The watch party build in this section uses the React SDK, checked 29 Sep 2026, with code copied verbatim from VideoSDK's Quick Start for Conference in React, whose complete example is the react-rtc folder of the VideoSDK quickstart repository (commit 54b8421). Its package.json requires @videosdk.live/react-sdk ^1.1.1, the version npm tagged latest on 29 Sep 2026.
Set up the project
Create a new React App using the below command.
npm create vite@latest videosdk-rtc-react-app -- --template reactInstall the VideoSDK using the below-mentioned npm command. Make sure you are in your react app directory before you run this command.
npm install "@videosdk.live/react-sdk"yarn add "@videosdk.live/react-sdk"Your project structure should look like this.
   root
   ├── node_modules
   ├── public
   ├── src
   │    ├── API.js
   │    ├── App.jsx
   │    ├── main.jsx
   .    .
You are going to use functional components to leverage react's reusable component architecture. There will be components for users, videos and controls (mic, camera, leave) over the video.
Create a room
Rooms come from a POST request with an auth token:
// Generate your token at https://app.videosdk.live/api-keys and paste it below.
export const authToken = "";

// API call to create meeting
export const createMeeting = async ({ token }) => {
  try {
    const res = await fetch(`https://api.videosdk.live/v2/rooms`, {
      method: "POST",
      headers: {
        authorization: `${token}`,
        "Content-Type": "application/json",
      },
      body: JSON.stringify({}),
    });

    if (!res.ok) {
      throw new Error(`Failed to create meeting: ${res.status}`);
    }

    //Destructuring the roomId from the response
    const { roomId } = await res.json();
    return roomId;
  } catch (error) {
    console.error("createMeeting failed", error);
    throw error;
  }
};
The sample pastes a temporary dashboard token into client code, which suits development only. In production, per the authentication and token guide, your backend generates the token from your API key and secret and the client fetches it; the secret never ships to the browser.
Join the room and render the group
To build up wireframe of App.jsx, you need to use VideoSDK Hooks and Context Providers. VideoSDK provides MeetingProvider, MeetingConsumer, useMeeting and useParticipant hooks.
First you need to understand Context Provider and Consumer. Context is primarily used when some data needs to be accessible by many components at different nesting levels.
- MeetingProvider: This is the Context Provider. It accepts value
configandtokenas props. The Provider component accepts a value prop to be passed to consuming components that are descendants of this Provider. One Provider can be connected to many consumers. Providers can be nested to override values deeper within the tree. - MeetingConsumer: This is the Context Consumer. All consumers that are descendants of a Provider will re-render whenever the Provider's value prop changes.
- useMeeting: This is the meeting hook API. It includes all the information related to meeting such as join, leave, enable/disable mic or webcam etc.
- useParticipant: This is the participant hook API. It is responsible for handling all the events and props related to one particular participant such as name, webcamStream, micStream etc.
The Meeting Context provides a way to listen for any changes that occur when a participant joins the meeting or makes modifications to their microphone, camera, and other settings. Begin by making a few changes to the code in the App.jsx file.
import "./App.css";
import React, { useEffect, useRef, useState } from "react";
import {
  MeetingProvider,
  MeetingConsumer,
  useMeeting,
  useParticipant,
  VideoPlayer,
} from "@videosdk.live/react-sdk";
import { authToken, createMeeting } from "./API";

function JoinScreen({ getMeetingAndToken }) {
  return null;
}

function ParticipantView(props) {
  return null;
}

function Controls(props) {
  return null;
}

function MeetingView(props) {
  return null;
}

function App() {
  const [meetingId, setMeetingId] = useState(null);

  //Getting the meeting id by calling the api we just wrote
  const getMeetingAndToken = async (id) => {
    if (!authToken) {
      console.error("PLEASE PROVIDE TOKEN IN API.js FROM app.videosdk.live");
      return;
    }
    const meetingId =
      id == null ? await createMeeting({ token: authToken }) : id;
    setMeetingId(meetingId);
  };

  //This will set Meeting Id to null when meeting is left or ended
  const onMeetingLeave = () => {
    setMeetingId(null);
  };

  return authToken && meetingId ? (
    <MeetingProvider
      config={{
        meetingId,
        micEnabled: true,
        webcamEnabled: true,
        name: "C.V. Raman",
      }}
      token={authToken}
    >
      <MeetingConsumer>
        {() => (
          <MeetingView meetingId={meetingId} onMeetingLeave={onMeetingLeave} />
        )}
      </MeetingConsumer>
    </MeetingProvider>
  ) : (
    <JoinScreen getMeetingAndToken={getMeetingAndToken} />
  );
}

export default App;
App creates a room when the ID field is left untouched and wraps the view in MeetingProvider with the mic and webcam on.
JoinScreen, ParticipantView, Controls and MeetingView are placeholders that return nothing at this step, so the app compiles. The next steps replace each one with its full version; replace the placeholder rather than adding a second function with the same name.
Join screen will serve as a medium to either schedule a new meeting or join an existing one.
function JoinScreen({ getMeetingAndToken }) {
  const [meetingId, setMeetingId] = useState(null);
  const onClick = async () => {
    await getMeetingAndToken(meetingId);
  };
  return (
    <div>
      <input
        type="text"
        placeholder="Enter Meeting Id"
        onChange={(e) => {
          setMeetingId(e.target.value);
        }}
      />
      <button onClick={onClick}>Join</button>
      {" or "}
      <button onClick={onClick}>Create Meeting</button>
    </div>
  );
}
MeetingView joins on a button click (the user gesture autoplay rules need) and renders one tile per participant:
function MeetingView(props) {
  const [joined, setJoined] = useState(null);
  //Get the method which will be used to join the meeting.
  //We will also get the participants list to display all participants
  const { join, participants } = useMeeting({
    //callback for when meeting is joined successfully
    onMeetingJoined: () => {
      setJoined("JOINED");
    },
    //callback for when meeting is left
    onMeetingLeft: () => {
      props.onMeetingLeave();
    },
  });
  const joinMeeting = async () => {
    setJoined("JOINING");
    try {
      await join();
    } catch (error) {
      console.error("Failed to join meeting", error);
      setJoined(null);
    }
  };

  return (
    <div className="container">
      <h3>Meeting Id: {props.meetingId}</h3>
      {joined && joined == "JOINED" ? (
        <div>
          <Controls />
          //For rendering all the participants in the meeting
          {[...participants.keys()].map((participantId) => (
            <ParticipantView
              participantId={participantId}
              key={participantId}
            />
          ))}
        </div>
      ) : joined && joined == "JOINING" ? (
        <p>Joining the meeting...</p>
      ) : (
        <button onClick={joinMeeting}>Join</button>
      )}
    </div>
  );
}
Next step is to create MeetingView and Controls components to manage features such as join, leave, mute and unmute.
From v1.0.0, all these methods are asynchronous and return a Promise, so await them and handle failures with try / catch. For details, see the Migration Guide.
function Controls() {
  const { leave, toggleMic, toggleWebcam } = useMeeting();

  const handleLeave = async () => {
    try {
      await leave();
    } catch (error) {
      console.error("Failed to leave meeting", error);
    }
  };

  const handleToggleMic = async () => {
    try {
      await toggleMic();
    } catch (error) {
      console.error("Failed to toggle mic", error);
    }
  };

  const handleToggleWebcam = async () => {
    try {
      await toggleWebcam();
    } catch (error) {
      console.error("Failed to toggle webcam", error);
    }
  };

  return (
    <div>
      <button onClick={handleLeave}>Leave</button>
      <button onClick={handleToggleMic}>toggleMic</button>
      <button onClick={handleToggleWebcam}>toggleWebcam</button>
    </div>
  );
}
Before implementing the participant view, you need to understand a couple of concepts.
1. Forwarding Ref for mic. The useRef hook is responsible for referencing the audio component. It will be used to play and stop the audio of the participant.
const micRef = useRef(null);2. useParticipant Hook. The useParticipant hook is responsible for handling all the properties and events of one particular participant joined in the meeting. It will take participantId as argument.
const { micStream, webcamOn, micOn } = useParticipant(props.participantId);3. MediaStream API. The MediaStream API is beneficial for adding a MediaTrack to the audio tag, enabling the playback of audio.
const micRef = useRef(null);
const mediaStream = new MediaStream();
mediaStream.addTrack(micStream.track);

micRef.current.srcObject = mediaStream;
micRef.current
  .play()
  .catch((error) => console.error("micElem.current.play() failed", error));
Only use the MediaStream API for microphone access. The VideoPlayer component in VideoSDK automatically handles the video stream.
Now you can use both of the hooks and the API to create ParticipantView.
function ParticipantView(props) {
  const micRef = useRef(null);
  const { micStream, webcamOn, micOn, isLocal, displayName } = useParticipant(
    props.participantId
  );

  useEffect(() => {
    if (micRef.current) {
      if (micOn && micStream) {
        const mediaStream = new MediaStream();
        mediaStream.addTrack(micStream.track);

        micRef.current.srcObject = mediaStream;
        micRef.current
          .play()
          .catch((error) =>
            console.error("micElem.current.play() failed", error)
          );
      } else {
        micRef.current.srcObject = null;
      }
    }
  }, [micStream, micOn]);

  return (
    <div>
      <p>
        Participant: {displayName} | Webcam: {webcamOn ? "ON" : "OFF"} | Mic:{" "}
        {micOn ? "ON" : "OFF"}
      </p>
      <audio ref={micRef} autoPlay muted={isLocal} />
      {webcamOn && (
        <VideoPlayer
          participantId={props.participantId} // Required
          type="video" // "video" or "share"
          containerStyle={{
            height: "200px",
            width: "300px",
          }}
          className="h-full"
          classNameVideo="h-full"
          videoStyle={{}}
        />
      )}
    </div>
  );
}
Add the styles
The Vite template creates its own App.css, which the app runs with. To match the quickstart's layout, replace the contents of src/App.css with the quickstart's App.css from the react-rtc folder.
.App {
  text-align: center;
}

.App-logo {
  height: 40vmin;
  pointer-events: none;
}

@media (prefers-reduced-motion: no-preference) {
  .App-logo {
    animation: App-logo-spin infinite 20s linear;
  }
}

.App-header {
  background-color: #282c34;
  min-height: 100vh;
  display: flex;
  flex-direction: column;
  align-items: center;
  justify-content: center;
  font-size: calc(10px + 2vmin);
  color: white;
}

.App-link {
  color: #61dafb;
}

@keyframes App-logo-spin {
  from {
    transform: rotate(0deg);
  }
  to {
    transform: rotate(360deg);
  }
}
To run the complete example, clone the repository, open react-rtc, paste a token into API.js, and run npm install then npm run dev.
Add the playback sync channel
The quickstart has no sync code; three documented primitives supply it. The PubSub guide covers usePubSub(topic) and publish(message, options, payload): the message must be a string, structured fields such as action and position go in payload, and persist: true delivers earlier messages to late joiners through onOldMessagesReceived. publish() throws if it runs before the meeting is joined.
The Realtime Store guide fits the "current state" key: setValue stores and getValue returns string values of up to 1 KB per key, with 100 keys per session, last write wins, and onValueChanged reports each update. The DataStream guide suits frequent position heartbeats: send() has "reliable" and "unreliable" modes, a 15 KiB message limit, and onData returns a millisecond timestamp; only participants in SEND_AND_RECV mode can send. The React chat tutorial uses usePubSub for group chat.
Scale and cost when choosing a co-watching SDK
Watch party scale is bounded by concurrency, which the quotas page counts across your organisation: 50 concurrent hosts before you add billing details and 500 on Pay-As-You-Go. For a larger audience, the interactive live streaming (ILS) concept guide has hosts join as SEND_AND_RECV and the audience as RECV_ONLY. If you broadcast over HLS, RFC 8216 section 4.3.2.6 defines EXT-X-PROGRAM-DATE-TIME, which maps the first sample of a segment to an absolute date and time. The tag is optional for servers, and VideoSDK's docs do not say whether its HLS playlists include it, so fetch your stream's playlist and check before you build alignment on it.
On the pricing page, 720p video costs $0.004 per participant minute on Pay-As-You-Go, and a new account starts with a $20 credit. As a hypothetical, six friends in a two-hour 720p watch party use 720 participant minutes, or $2.88. The film comes from your own CDN, so its delivery sits on that bill.
Glossary
Leader client (host): The one participant whose player state the others copy; if the leader leaves, another participant must take the role.
Playback drift: The growing gap between two players that started at the same position.
Clock offset (clock skew): The difference between two devices' clocks at the same instant.
Realtime Store: A per-session key-value store in the VideoSDK React SDK that every participant can read and observe.
EXT-X-PROGRAM-DATE-TIME: An HLS playlist tag that maps the first sample of a segment to an absolute date and time.
Key takeaways
- A watch party API is three parts: a room for faces and voices, a player per viewer, and a sync channel for play, pause and seek.
- Use local playback plus sync for small groups, screen share when the content offers no API, and broadcast for large audiences.
- Stamp every control message with a position and a sent-at time, correct for clock offset, then nudge
playbackRatefor small gaps and seek for large ones.
Start with the react-rtc sample, add a leader and one playback topic, and measure drift between two browsers before tuning thresholds. For host and audience modes and HLS broadcast, read the VideoSDK interactive live streaming docs.
Frequently asked questions
How do you build a watch party or co-watching app?
You build one in four steps. Create a video room and join each viewer to it. Load the same video in every viewer's player. Choose a leader whose play, pause and seek actions are published with a position and timestamp. Have followers apply each message, correct drift, and read stored state when they join late.
Can you screen share a streaming service in a watch party?
You can share a browser tab, but results depend on the service and the browser. VideoSDK's React screen share guide says screen sharing works in desktop browsers only, and tab audio only when sharing a Chrome tab in a Chromium-based browser. Services that protect video with digital rights management (DRM) can keep their frames out of a capture: Apple's Technical Q&A QA1970 says FairPlay Streaming video in an iOS app is blacked out in screen recordings. Test the specific service and browser before you rely on screen share, and check the licensing terms too.
How many people can join a watch party?
On VideoSDK, a room holds up to 100 participants and 15 active speakers by default, according to the quotas page (read 29 September 2026). Audience-only viewers have separate per-room limits: 1,000 for interactive live streaming and 200 for HLS. Organisation-wide concurrency limits apply on top, including 100 concurrent viewers before you add billing details and 200 on Pay-As-You-Go, which add-on packs can raise.