


A React HLS player is a video component that plays HTTP Live Streaming (HLS) streams, typically powered by hls.js, inside a React application. It handles adaptive bitrate switching, live-stream playback, and browser fallback automatically, so you ship one component that works across Chrome, Firefox, Edge, and Safari. If you also need sub-second interactive streaming rather than 10 to 30 second HLS latency, VideoSDK's interactive live streaming is built for exactly that, and this guide covers when to use each approach.
Getting reliable HLS playback in a React app sounds simple until you actually build it. The stream works on your laptop, stutters on mobile data, plays perfectly in Safari, and throws a cryptic media error in Chrome. That is the reality of HTTP Live Streaming in the browser: Safari supports HLS natively, most other browsers do not, and the gap is bridged by a JavaScript library called hls.js wrapped in a React component.
This article covers what a React HLS player actually is, which features matter when you pick a package, how to integrate one into your app, and how to handle the production problems that tutorials skip: error recovery, reconnection, accessibility, and performance. By the end, you will know how to choose a package, wire it up, and ship it.
What Is a React HLS Player?
A React HLS player is defined as a React component that renders an HTML video element and attaches an HLS playback engine to it, so the app can play streams delivered in the .m3u8 manifest format. The component's job is to translate between React's declarative world and the imperative, event-driven world of streaming media.
The underlying engine for almost every React HLS player is hls.js, the open-source JavaScript library maintained by the video-dev community. hls.js parses the HLS manifest, fetches media segments over standard HTTP, converts them into fragmented MP4 data, and feeds that data to the browser's native media source extensions. Safari is the exception: it supports HLS natively, so a good React wrapper detects this and attaches the manifest URL directly to the video element instead of running the hls.js engine.
A dedicated React wrapper matters because raw hls.js is imperative. You create an instance, attach it to a video element, listen for events, and destroy it on unmount. A React wrapper handles that lifecycle for you, exposes props for autoplay, controls, and poster images, and cleans up correctly when the component unmounts. Without a wrapper, the most common bug in React HLS apps is a leaked hls.js instance after a route change, which keeps downloading segments in the background and drains the user's bandwidth.
Core Features to Look for in a React HLS Player
Any React HLS player worth using should cover five capabilities: adaptive bitrate, live-stream support, TypeScript typings, customizable controls, and native Safari fallback. A package that misses even one of these will cost you time later.
Adaptive bitrate is the foundation. The player should read the manifest's quality levels and switch between them as network conditions change, without you writing any switching logic. Live-stream support means the player exposes a live badge, handles live-edge seeking, and ideally supports low-latency HLS variants. TypeScript typings matter because a typed component gives you autocomplete for props and compile-time safety for event handlers, which is the difference between a five-minute integration and an afternoon of guessing prop names.
Custom controls are essential for real products. The default browser controls are fine for a prototype, but a branded player needs its own play button, progress bar, volume slider, and quality selector. Finally, native fallback on Safari means the wrapper checks whether the browser supports HLS natively and skips the hls.js engine entirely, saving roughly 600 KB of JavaScript on the one browser that does not need it.
Adaptive Bitrate and Buffer Management
Adaptive bitrate works by measuring how fast segments download and comparing that against the playback bitrate. When the network is healthy, the player climbs to higher renditions; when throughput drops, it steps down before the buffer runs dry. The result is continuous playback at the highest quality the connection can sustain.
Buffer management is the other half of the equation. The player maintains a forward buffer of downloaded segments, and its goal is to keep that buffer deep enough to absorb a bandwidth dip without stalling. In practice, teams integrating hls.js-based players consistently find that the default buffer settings work well for video-on-demand but need tuning for live streams, where chasing the live edge with too large a buffer actually increases latency. Look for a package that exposes buffer configuration through props rather than hiding it, because you will want to adjust it per use case.
Live-Stream Support and Low-Latency Mode
A live-capable React HLS player shows a live badge, disables or limits seeking behind the live edge, and automatically jumps the viewer forward when they fall behind. Standard HLS live latency sits in the 10 to 30 second range, which is fine for watching a concert but unusable for a live auction or a live shopping event where the audience needs to react in real time.
Low-latency HLS narrows that gap by using partial segments and a blocking playlist reload pattern, bringing latency down toward a few seconds. If your product genuinely needs sub-second interaction, such as live shopping, tutoring, or stage-based events, HLS is the wrong tool entirely. VideoSDK's interactive live streaming keeps latency low enough for real-time audience interaction, and it runs on the same SDK surface as its video calling API, so you can add both to the same app.
Choosing the Right Package: A Comparison Framework
Picking a React HLS player package comes down to five criteria, and weighing them deliberately beats installing the first result from an npm search.
The first criterion is bundle size. hls.js itself is the bulk of the weight, so the wrapper should add almost nothing on top. The second is TypeScript support: a package with first-class typings documents its own API through your editor, which reduces integration time dramatically. The third is feature set: does it expose the underlying hls.js instance so you can configure levels, buffers, and error policies, or does it lock you into a fixed abstraction? The fourth is community activity: check the GitHub repository for recent commits, open issue response times, and whether the package tracks current hls.js releases. An abandoned wrapper pinned to an old hls.js version inherits that version's bugs and security issues. The fifth is documentation quality: a README with prop tables, event lists, and working examples signals a maintainer who respects integrators.
Popular options in the ecosystem include @im03/react-hls-player, react-hls-video-player, and react-helios, each with different trade-offs across these five criteria. Some prioritize a minimal API surface with strong typings, others offer richer built-in controls. Evaluate them against your specific needs rather than defaulting to the most-downloaded option, because download counts lag years behind maintenance reality.
| Criterion | What to check | Why it matters |
|---|---|---|
| Bundle size | Added weight beyond hls.js | Directly affects page load and Core Web Vitals |
| TypeScript support | First-class typings, not a community stub | Faster integration, fewer runtime prop errors |
| Feature set | Access to the hls.js instance | Enables level control and error policy tuning |
| Community activity | Recent commits, hls.js version tracking | Abandoned wrappers inherit old engine bugs |
| Documentation | Prop tables, event lists, examples | Predicts integration time |
[LINKABLE ASSET — comparison framework table]
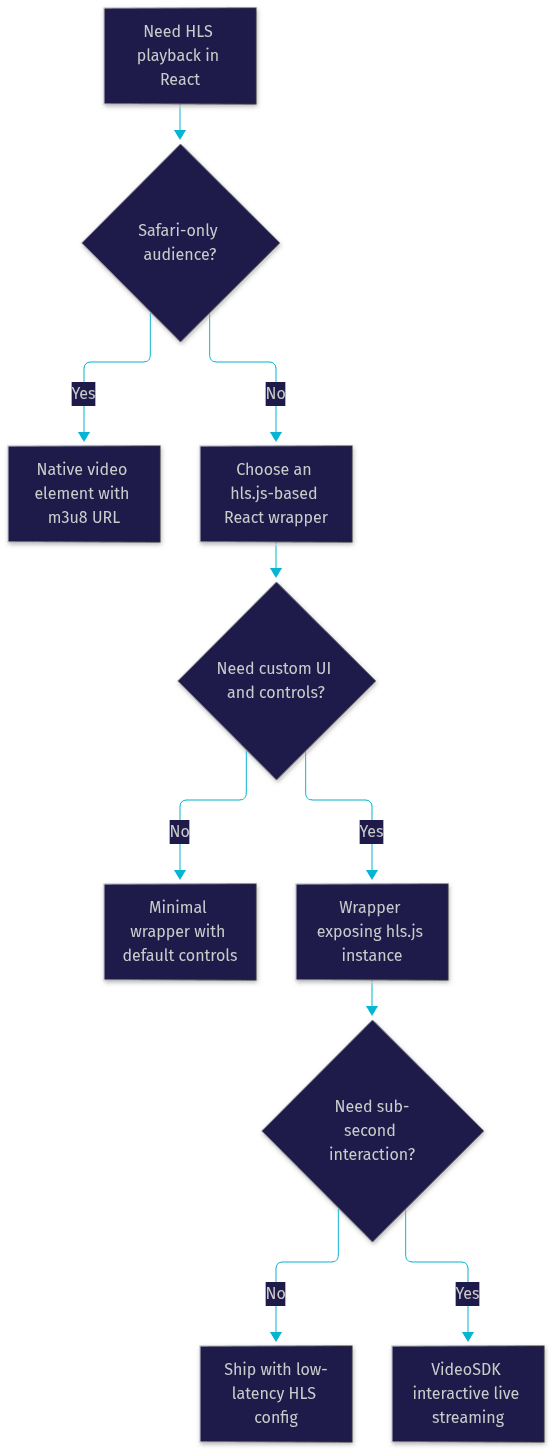
The flowchart below visualizes how the decision typically unfolds, from a basic playback need up to advanced requirements that push you toward a full interactive streaming platform.
Integrating a React HLS Player into Your App
Integration follows a predictable path: install, add the component, pass the stream URL, configure optional props, and wire up lifecycle events. Each step has a specific intent and an expected outcome.
Step 1: Install the package. Add your chosen wrapper from npm as a regular dependency, not a dev dependency, since it ships to the browser. The expected outcome is a package entry in your dependencies and a component ready to import.
Step 2: Add the component to a page. Place the player component where the video should appear, giving it a sensible width through your layout. The component renders a standard HTML video element under the hood, so all your existing CSS techniques apply.
Step 3: Pass the .m3u8 URL. The manifest URL is the single required prop in most wrappers. The player fetches the manifest, parses its quality levels, and starts buffering the first segments. If the URL is wrong or the manifest is malformed, you will see an error event rather than a silent failure, which is why error handling in the next section is not optional.
Step 4: Configure optional props. Autoplay, controls, and a poster image are the common trio. Note that browsers block autoplay with sound, so muted autoplay is the pattern that actually works. A poster image improves perceived performance by showing something meaningful before the first segment arrives.
Step 5: Handle lifecycle events. Listen for the ready event to hide a loading spinner, the buffering event to show one, and the error event to display a retry option. These three states cover ninety percent of the UI work around a streaming player.
Step 6: Protect the stream with server-side tokens. If your streams are access-controlled, generate signed or tokenized manifest URLs on your server and hand the short-lived URL to the player, never a permanent one. This mirrors the token-based authentication pattern used across real-time platforms: VideoSDK's authentication and token guide explains the same principle for meeting rooms, and it applies equally to protected HLS manifests. Never embed long-lived stream credentials in frontend code, because anything in the client bundle is public.
The architecture below shows how the pieces fit together in a typical deployment.

Handling Errors and Re-connections
HLS streams fail in production for reasons you cannot control: CDN hiccups, encoder restarts, and mobile networks that drop mid-session. A production-ready React HLS player treats recovery as a feature, not an afterthought.
The standard pattern is exponential back-off retry. When a segment fetch or manifest reload fails, retry after a short delay, then double that delay on each consecutive failure, up to a cap. This avoids hammering a struggling origin while recovering quickly from transient blips. hls.js exposes error events with enough detail to distinguish recoverable errors, like a failed segment fetch, from fatal ones, like an unrecoverable manifest error, and your wrapper should surface that distinction.
On the UI side, always pair retries with honest feedback. A spinner with no explanation for thirty seconds reads as a broken app. Show a brief message like "reconnecting" during retries, and after repeated failures, offer a manual retry button and, if available, a lower-quality fallback stream. Users forgive a hiccup; they do not forgive silence.
Accessibility and SEO Considerations
An accessible React HLS player is a legal requirement in many markets and simply better product design everywhere. Provide caption tracks through the manifest or as separate track elements, label every custom control with ARIA attributes, and ensure the player is fully operable by keyboard. Screen readers announce a labeled play button; they announce nothing for a decorative div with a click handler.
For SEO, remember that crawlers generally cannot watch video, so the metadata around the player carries the ranking weight. Include a descriptive title, a transcript where feasible, and structured video metadata on the page. Preloading the stream's metadata rather than the full video reduces initial page weight, which helps Core Web Vitals, a signal that affects how both Google and AI search systems evaluate your page.
Performance Tips for Production
Performance for an HLS player is mostly about where the segments come from and how fast they arrive.
Serve manifests and segments from a CDN, full stop. The CDN's edge location determines the round-trip time for every segment fetch, and segment fetch time is the direct input to the adaptive bitrate algorithm: slow fetches push the player to lower quality. Enable HTTP/2 on the CDN so the browser can multiplicate segment requests over a single connection instead of queueing them.
Configure cache headers aggressively for segments, since they are immutable once published, but keep manifest cache times short for live streams so players pick up playlist updates promptly. Finally, test on throttled networks before shipping. Chrome's dev tools let you simulate a slow 3G connection, and it is better to discover your buffer configuration stalls on simulated 3G than to discover it in a one-star review. If your product also includes interactive features like chat or polls alongside the stream, VideoSDK's collaborative features handle that layer without you building a separate real-time backend.
Real-World Use Cases
E-learning platforms use React HLS players to deliver lecture recordings at multiple qualities, so students on dorm Wi-Fi and rural connections both get smooth playback. The adaptive bitrate engine quietly serves 1080p to some viewers and 480p to others from the same manifest.
Live shopping events pair an HLS stream with product overlays and chat. Here the latency question from earlier becomes decisive: if the host flashes a discount code for sixty seconds, a twenty-second HLS delay means half the audience misses it. Teams building these experiences often combine HLS for the broadcast feed with an interactive layer, or move the whole event onto VideoSDK's live streaming SDK for sub-second interaction.
Sports broadcasting is the classic HLS use case: massive concurrent audiences, strict CDN distribution, and adaptive quality that degrades gracefully when a stadium's cell network saturates at kickoff. The same architecture scales from a local league stream to a national broadcast.
Definitions Glossary
HLS (HTTP Live Streaming): A streaming protocol created by Apple that delivers video as a playlist manifest (.m3u8) pointing to short media segments, enabling adaptive quality over ordinary HTTP.
hls.js: An open-source JavaScript engine that plays HLS streams in browsers lacking native support by converting segments into data the browser's media source extensions can consume.
Adaptive bitrate: The player's ability to switch between quality renditions in real time based on measured network throughput, keeping playback continuous.
Manifest (.m3u8): The playlist file that lists available quality levels and the segment URLs for each, which the player fetches first and re-fetches for live streams.
Interactive Live Streaming (ILS): VideoSDK's low-latency streaming mode where viewers can interact, chat, and be promoted to active speakers in real time, unlike high-latency HLS broadcast.
Key Takeaways
- A React HLS player wraps hls.js in a React component, handling engine lifecycle, adaptive bitrate, and native Safari fallback so you do not manage them manually.
- Choose a package using five criteria: bundle size, TypeScript support, access to the hls.js instance, community activity, and documentation quality.
- Always handle error events with exponential back-off retries and honest user-facing feedback, because stream failures in production are inevitable.
- Protect streams with server-generated, short-lived signed URLs, never long-lived credentials in frontend code.
- Standard HLS latency runs 10 to 30 seconds; when your use case needs real-time audience interaction, use an interactive streaming platform like VideoSDK instead.
Conclusion
Building a React HLS player in 2026 is a solved problem if you respect its edges: pick a maintained wrapper, wire lifecycle events properly, protect your manifests with server-side tokens, and tune buffers for your latency needs. The component handles the hard media work; your job is the integration discipline around it. When your project crosses from broadcast-style streaming into real-time interaction, VideoSDK's interactive live streaming covers that ground with sub-second latency and built-in chat, polls, and role management. You can start free on VideoSDK's platform and explore the code samples or join the VideoSDK Discord community to compare notes with other developers. What are you building with a React HLS player? Drop a comment, I'd love to hear what kind of streaming use case you're working on.
Free $20 Balance for AI Voice Agents & Video Calls
FAQ