Build Your Own: A Complete Guide to Creating an Angular Video Chat App
A comprehensive guide to building an Angular video chat application using Stream Chat and Video SDKs. This step-by-step tutorial covers setting up an Angular project, integrating chat functionality, implementing video calling, and creating a seamless user interface.
In today's digitally connected world, real-time communication has become essential for businesses and individuals alike. Video chat applications have seen unprecedented growth, especially with the rise of remote work and virtual meetings. While there are many off-the-shelf solutions available, building your own Angular video chat app gives you complete control over features, user experience, and integration with your existing products.
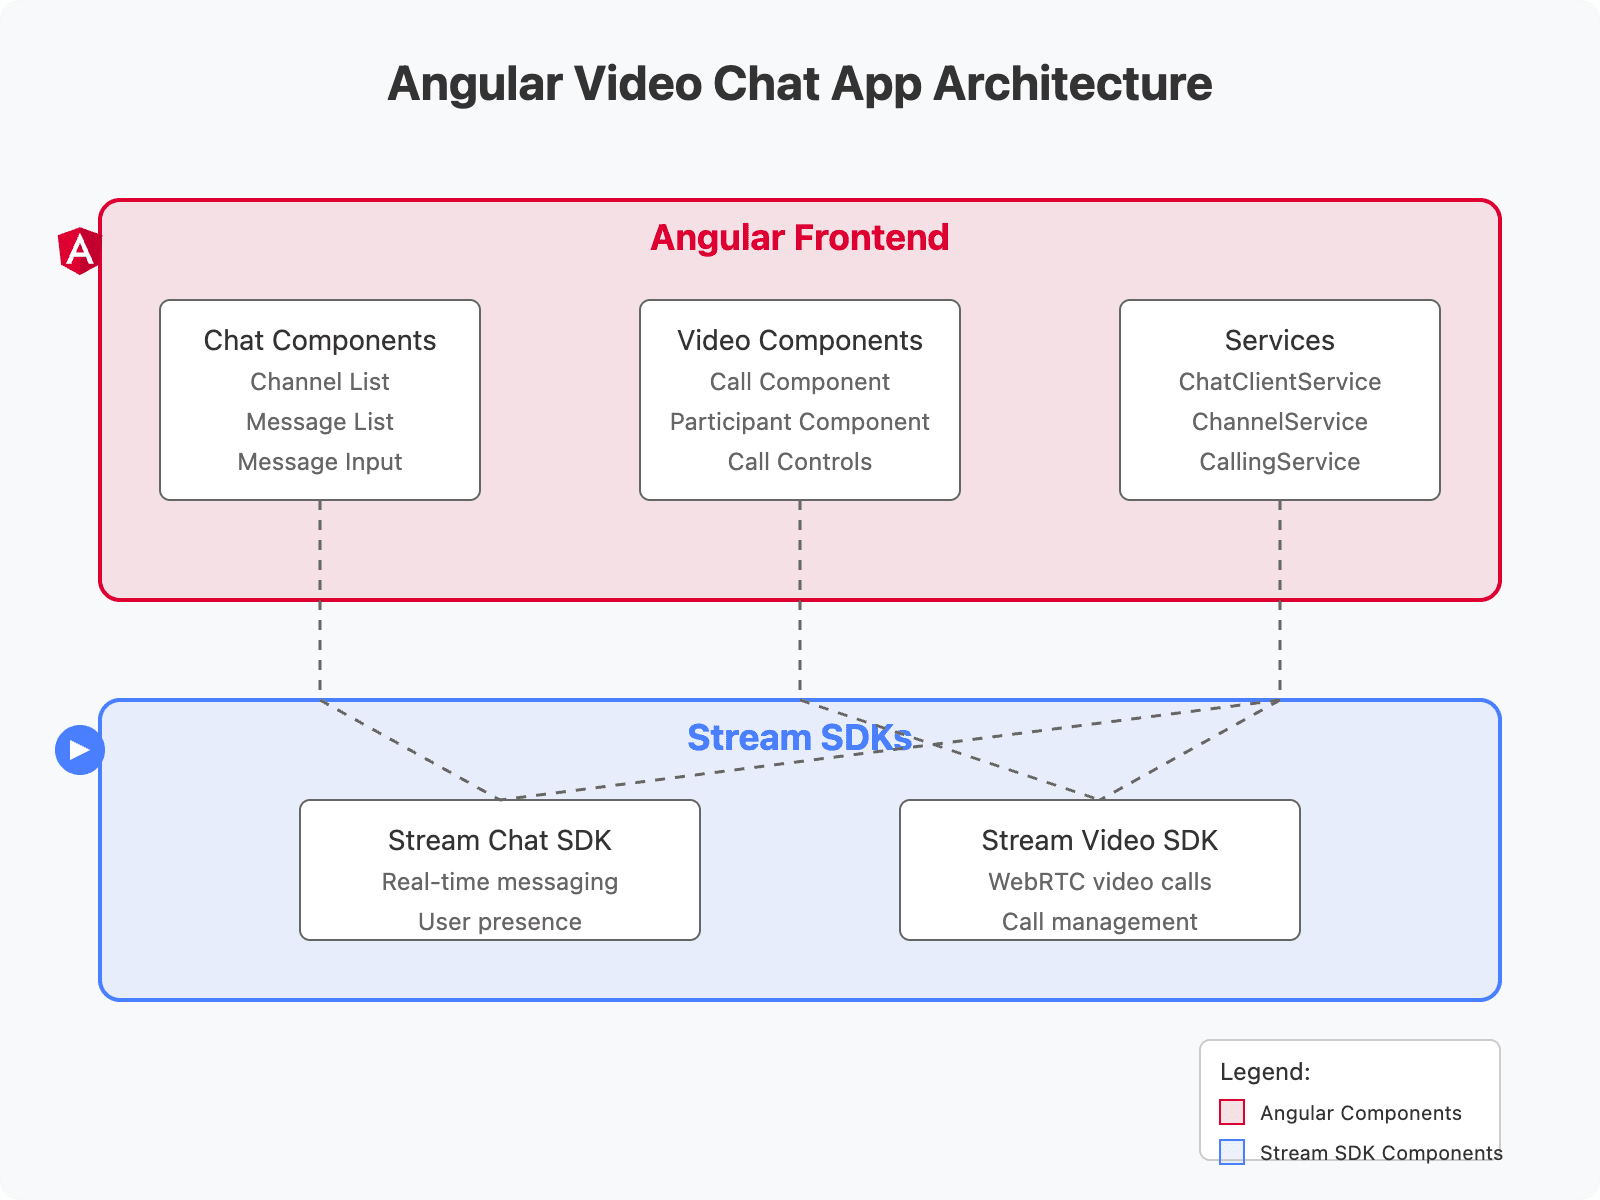
This guide will walk you through creating a full-featured video chat application using Angular and Stream's powerful Chat and Video SDKs. By the end, you'll have a working application that supports text chat and video calling with minimal effort.
Setting Up Your Angular Project
Before diving into the code, make sure you have the following prerequisites installed:
- Node.js (version 14 or higher)
- Angular CLI (latest version)
To install Angular CLI globally, run:
1npm install -g @angular/cli
2
Next, create a new Angular project:
1ng new video-chat-angular --routing false --style css --ssr false
2cd video-chat-angular
3
Once your project is created, install the necessary dependencies:
1npm install stream-chat-angular stream-chat @stream-io/video-client @ngx-translate/core
2
These packages will provide:
stream-chat-angular: Angular components for the chat interfacestream-chat: Core Stream Chat client library@stream-io/video-client: Stream's Video SDK for implementing video calls@ngx-translate/core: Internationalization support for the chat components
Integrating Chat Functionality
Now, let's configure the Angular Chat SDK by modifying the app configuration and component files.
First, update your
app.config.ts file:1import { ApplicationConfig, importProvidersFrom } from '@angular/core';
2import { TranslateModule } from '@ngx-translate/core';
3import {
4 StreamChatModule,
5 StreamAutocompleteTextareaModule
6} from 'stream-chat-angular';
7
8export const appConfig: ApplicationConfig = {
9 providers: [
10 importProvidersFrom(
11 StreamChatModule,
12 StreamAutocompleteTextareaModule,
13 TranslateModule.forRoot()
14 )
15 ]
16};
17Next, modify your
app.component.ts to initialize the Stream Chat client:1import { Component, OnInit } from '@angular/core';
2import { CommonModule } from '@angular/common';
3import {
4 ChatClientService,
5 ChannelService,
6 StreamChatModule,
7 StreamAutocompleteTextareaModule
8} from 'stream-chat-angular';
9import { environment } from '../environments/environment';
10import { TranslateModule } from '@ngx-translate/core';
11
12@Component({
13 selector: 'app-root',
14 standalone: true,
15 imports: [
16 CommonModule,
17 StreamChatModule,
18 StreamAutocompleteTextareaModule,
19 TranslateModule
20 ],
21 templateUrl: './app.component.html',
22 styleUrls: ['./app.component.css']
23})
24export class AppComponent implements OnInit {
25 constructor(
26 private chatClientService: ChatClientService,
27 private channelService: ChannelService
28 ) {}
29
30 async ngOnInit() {
31 // Replace with your actual API key from Stream Dashboard
32 const apiKey = 'YOUR_STREAM_API_KEY';
33
34 await this.chatClientService.init(apiKey);
35
36 // Replace with your user details and token
37 await this.chatClientService.connectUser(
38 {
39 id: 'user-id',
40 name: 'User Name',
41 image: 'https://getstream.io/random_svg/?id=user-id&name=User+Name'
42 },
43 'USER_TOKEN' // Generate this server-side
44 );
45
46 // Create or join a channel
47 await this.channelService.init({
48 type: 'messaging',
49 id: 'talking-about-angular',
50 name: 'Talking About Angular'
51 });
52 }
53}
54You'll need to create an account on
Stream
to get your API key and generate user tokens.Update your
app.component.html to include the Stream Chat components:1<div class="chat-container">
2 <div class="channel-list">
3 <stream-channel-list></stream-channel-list>
4 </div>
5 <div class="channel-container">
6 <stream-channel></stream-channel>
7 </div>
8</div>
9Add some basic styles in your
styles.css:1@import '~stream-chat-angular/src/assets/styles/v2/scss/index.scss';
2
3.chat-container {
4 display: flex;
5 height: 100vh;
6}
7
8.channel-list {
9 width: 30%;
10 max-width: 300px;
11 border-right: 1px solid #E0E0E0;
12}
13
14.channel-container {
15 flex: 1;
16}
17Implementing Video Calling
Now, let's add video calling capabilities using Stream's Video SDK. First, create a service to manage the video call logic:
1ng generate service calling
2
Edit the
calling.service.ts file:1import { Injectable, signal } from '@angular/core';
2import {
3 StreamVideoClient,
4 Call,
5 CallType,
6 StreamVideo,
7 User,
8 CallParticipant
9} from '@stream-io/video-client';
10
11@Injectable({
12 providedIn: 'root'
13})
14export class CallingService {
15 private videoClient: StreamVideoClient | null = null;
16 private apiKey = 'YOUR_STREAM_API_KEY'; // Same as chat API key
17
18 // Use Angular signals for reactive state management
19 currentCall = signal<Call | null>(null);
20 participants = signal<CallParticipant[]>([]);
21
22 async initVideoClient(userId: string, userToken: string) {
23 if (this.videoClient) return;
24
25 this.videoClient = new StreamVideoClient({
26 apiKey: this.apiKey,
27 user: {
28 id: userId,
29 name: 'User Name',
30 image: 'https://getstream.io/random_svg/?id=' + userId
31 },
32 token: userToken
33 });
34 }
35
36 async startCall(callId: string) {
37 if (!this.videoClient) {
38 throw new Error('Video client not initialized');
39 }
40
41 // Create a new call or join an existing one
42 const call = this.videoClient.call(CallType.Default, callId);
43 await call.getOrCreate();
44
45 // Join the call with camera and microphone enabled
46 await call.join({ camera: true, microphone: true });
47
48 // Update the signals
49 this.currentCall.set(call);
50 this.updateParticipants(call);
51
52 // Listen for participant changes
53 call.on('call.participant_joined', () => this.updateParticipants(call));
54 call.on('call.participant_left', () => this.updateParticipants(call));
55
56 return call;
57 }
58
59 private updateParticipants(call: Call) {
60 this.participants.set([...call.participants.values()]);
61 }
62
63 async endCall() {
64 const call = this.currentCall();
65 if (call) {
66 await call.leave();
67 this.currentCall.set(null);
68 this.participants.set([]);
69 }
70 }
71
72 toggleMicrophone() {
73 const call = this.currentCall();
74 if (call) {
75 call.microphone.toggle();
76 }
77 }
78
79 toggleCamera() {
80 const call = this.currentCall();
81 if (call) {
82 call.camera.toggle();
83 }
84 }
85}
86Next, create call and participant components:
1ng generate component call
2ng generate component participant
3
Update the
call.component.ts:1import { Component, OnInit, OnDestroy } from '@angular/core';
2import { CommonModule } from '@angular/common';
3import { CallingService } from '../calling.service';
4import { ParticipantComponent } from '../participant/participant.component';
5
6@Component({
7 selector: 'app-call',
8 standalone: true,
9 imports: [CommonModule, ParticipantComponent],
10 template: `
11 <div class="call-container" *ngIf="callingService.currentCall()">
12 <div class="participants-grid">
13 <app-participant
14 *ngFor="let participant of callingService.participants()"
15 [participant]="participant"
16 ></app-participant>
17 </div>
18 <div class="call-controls">
19 <button (click)="toggleMicrophone()">
20 Toggle Microphone
21 </button>
22 <button (click)="toggleCamera()">
23 Toggle Camera
24 </button>
25 <button (click)="endCall()" class="end-call">
26 End Call
27 </button>
28 </div>
29 </div>
30 `,
31 styles: [`
32 .call-container {
33 display: flex;
34 flex-direction: column;
35 height: 100%;
36 background-color: #f2f2f2;
37 }
38 .participants-grid {
39 display: grid;
40 grid-template-columns: repeat(auto-fit, minmax(300px, 1fr));
41 gap: 16px;
42 padding: 16px;
43 flex: 1;
44 }
45 .call-controls {
46 display: flex;
47 justify-content: center;
48 gap: 16px;
49 padding: 16px;
50 background-color: #ffffff;
51 border-top: 1px solid #e0e0e0;
52 }
53 .end-call {
54 background-color: #e74c3c;
55 color: white;
56 }
57 `]
58})
59export class CallComponent {
60 constructor(public callingService: CallingService) {}
61
62 toggleMicrophone() {
63 this.callingService.toggleMicrophone();
64 }
65
66 toggleCamera() {
67 this.callingService.toggleCamera();
68 }
69
70 endCall() {
71 this.callingService.endCall();
72 }
73}
74And the
participant.component.ts:1import { Component, Input, AfterViewInit, ViewChild, ElementRef } from '@angular/core';
2import { CommonModule } from '@angular/common';
3import { CallParticipant } from '@stream-io/video-client';
4
5@Component({
6 selector: 'app-participant',
7 standalone: true,
8 imports: [CommonModule],
9 template: `
10 <div class="participant-container">
11 <div class="video-container" #videoContainer></div>
12 <div class="participant-info">
13 <span>{{ participant.name || participant.userId }}</span>
14 <span *ngIf="!participant.isSpeaking && participant.audioLevel > 0">
15 (Speaking)
16 </span>
17 </div>
18 </div>
19 `,
20 styles: [`
21 .participant-container {
22 position: relative;
23 aspect-ratio: 16/9;
24 background-color: #333;
25 border-radius: 8px;
26 overflow: hidden;
27 }
28 .video-container {
29 position: absolute;
30 top: 0;
31 left: 0;
32 width: 100%;
33 height: 100%;
34 }
35 .participant-info {
36 position: absolute;
37 bottom: 8px;
38 left: 8px;
39 background-color: rgba(0, 0, 0, 0.5);
40 color: white;
41 padding: 4px 8px;
42 border-radius: 4px;
43 font-size: 14px;
44 }
45 `]
46})
47export class ParticipantComponent implements AfterViewInit {
48 @Input() participant!: CallParticipant;
49 @ViewChild('videoContainer') videoContainer!: ElementRef;
50
51 ngAfterViewInit() {
52 if (this.participant.videoTrack) {
53 const videoElement = this.participant.videoTrack.attach();
54 this.videoContainer.nativeElement.appendChild(videoElement);
55 }
56
57 // Listen for track changes
58 this.participant.on('trackAdded', (track) => {
59 if (track.kind === 'video') {
60 const videoElement = track.attach();
61 this.videoContainer.nativeElement.innerHTML = '';
62 this.videoContainer.nativeElement.appendChild(videoElement);
63 }
64 });
65 }
66}
67Enhancing the User Interface with a "Start Call" Button
Now, let's integrate the video calling with our chat interface by adding a "Start Call" button. Update your
app.component.html:1<div class="chat-container">
2 <div class="channel-list">
3 <stream-channel-list></stream-channel-list>
4 </div>
5 <div class="channel-container">
6 <div class="channel-header">
7 <h2>{{ channelName }}</h2>
8 <button class="call-button" (click)="startCall()">
9 Start Video Call
10 </button>
11 </div>
12 <div class="call-or-chat">
13 <app-call *ngIf="showCall"></app-call>
14 <stream-channel *ngIf="!showCall"></stream-channel>
15 </div>
16 </div>
17</div>
18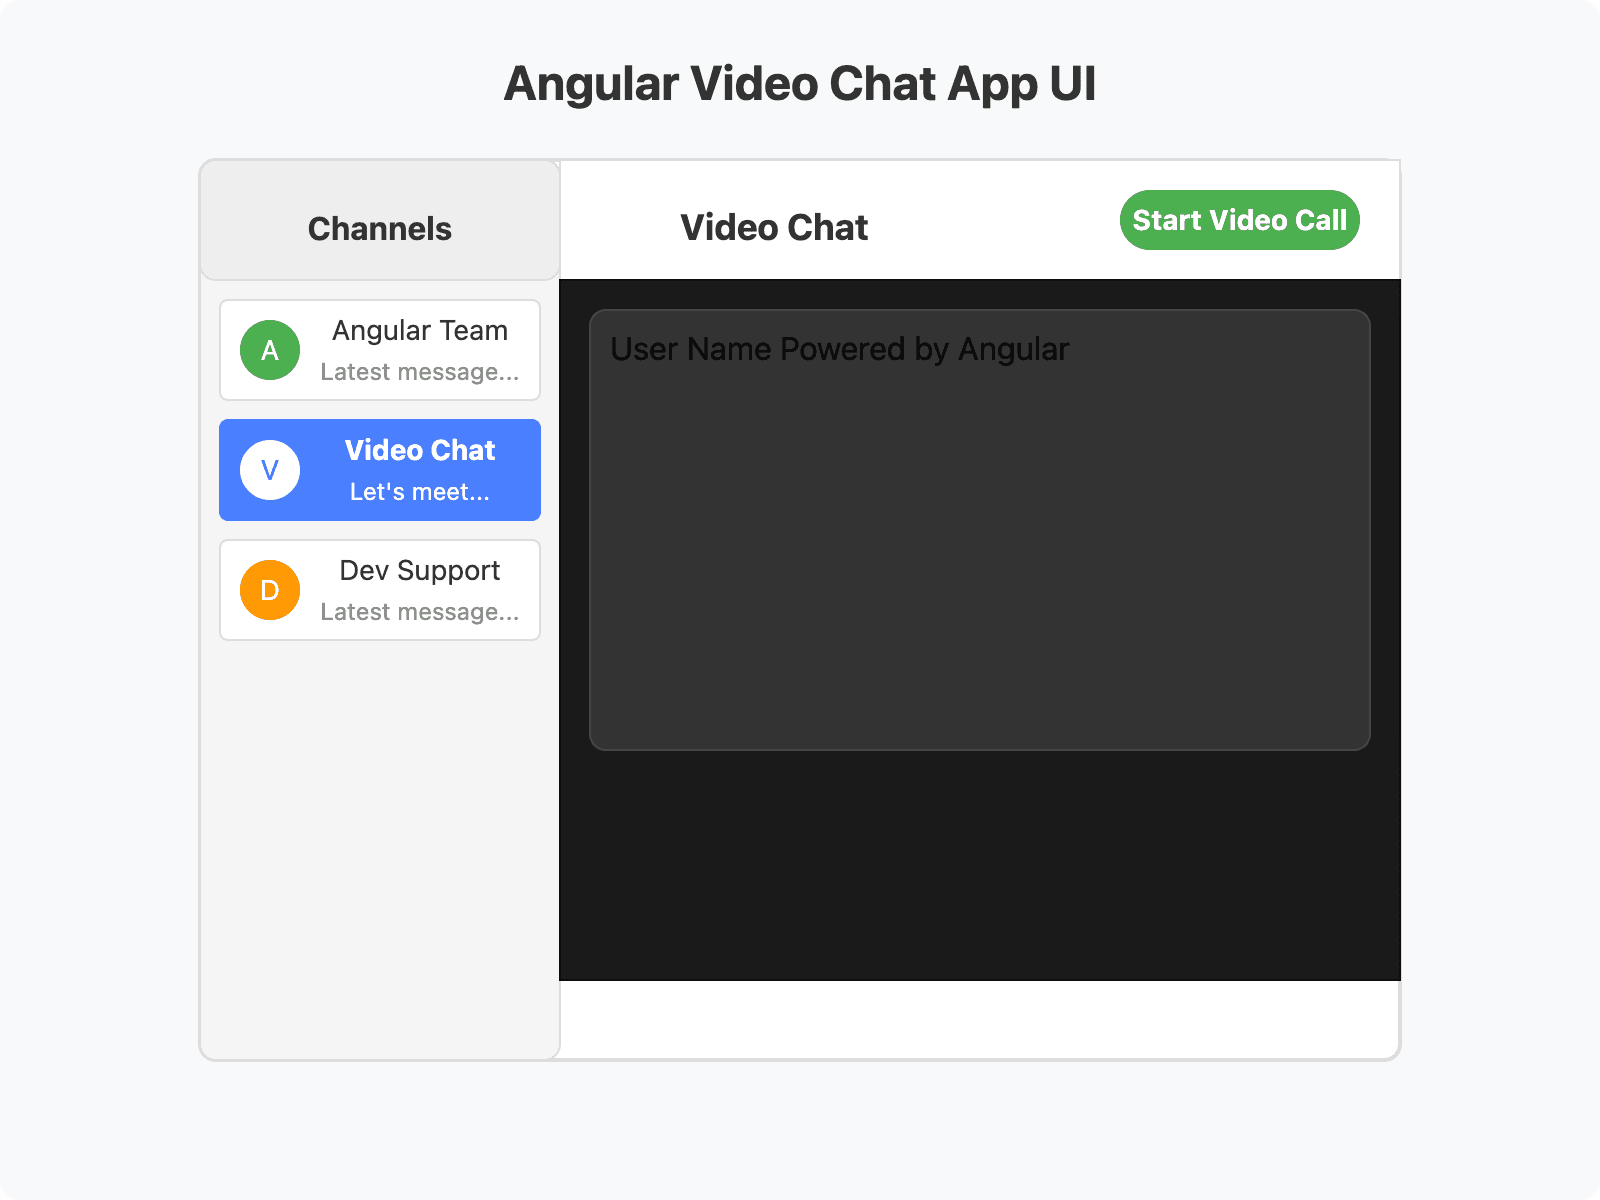
Add the necessary properties and methods to your
app.component.ts:1import { Component, OnInit } from '@angular/core';
2import { CommonModule } from '@angular/common';
3import {
4 ChatClientService,
5 ChannelService,
6 StreamChatModule,
7 StreamAutocompleteTextareaModule
8} from 'stream-chat-angular';
9import { environment } from '../environments/environment';
10import { TranslateModule } from '@ngx-translate/core';
11import { CallingService } from './calling.service';
12import { CallComponent } from './call/call.component';
13
14@Component({
15 selector: 'app-root',
16 standalone: true,
17 imports: [
18 CommonModule,
19 StreamChatModule,
20 StreamAutocompleteTextareaModule,
21 TranslateModule,
22 CallComponent
23 ],
24 templateUrl: './app.component.html',
25 styleUrls: ['./app.component.css']
26})
27export class AppComponent implements OnInit {
28 channelName = 'Talking About Angular';
29 showCall = false;
30
31 constructor(
32 private chatClientService: ChatClientService,
33 private channelService: ChannelService,
34 private callingService: CallingService
35 ) {}
36
37 async ngOnInit() {
38 // Replace with your actual API key from Stream Dashboard
39 const apiKey = 'YOUR_STREAM_API_KEY';
40
41 await this.chatClientService.init(apiKey);
42
43 // Replace with your user details and token
44 const userId = 'user-id';
45 const userToken = 'USER_TOKEN'; // Generate this server-side
46
47 await this.chatClientService.connectUser(
48 {
49 id: userId,
50 name: 'User Name',
51 image: 'https://getstream.io/random_svg/?id=' + userId
52 },
53 userToken
54 );
55
56 // Initialize video client with the same credentials
57 await this.callingService.initVideoClient(userId, userToken);
58
59 // Create or join a channel
60 await this.channelService.init({
61 type: 'messaging',
62 id: 'talking-about-angular',
63 name: this.channelName
64 });
65 }
66
67 async startCall() {
68 try {
69 // Use channel ID as call ID for simplicity
70 await this.callingService.startCall('talking-about-angular');
71 this.showCall = true;
72 } catch (error) {
73 console.error('Failed to start call:', error);
74 }
75 }
76}
77Add some styles to
app.component.css:1.channel-header {
2 display: flex;
3 justify-content: space-between;
4 align-items: center;
5 padding: 16px;
6 border-bottom: 1px solid #e0e0e0;
7}
8
9.call-button {
10 background-color: #4CAF50;
11 color: white;
12 border: none;
13 padding: 8px 16px;
14 border-radius: 4px;
15 cursor: pointer;
16 font-weight: bold;
17}
18
19.call-button:hover {
20 background-color: #45a049;
21}
22
23.call-or-chat {
24 height: calc(100% - 69px);
25}
26Testing and Debugging
To test your Angular video chat app, run:
1ng serve
2
Navigate to
http://localhost:4200 in your browser. You should see the chat interface with a "Start Video Call" button.Common issues and solutions:
- Microphone or camera not working: Make sure to grant necessary browser permissions.
- CORS issues: Ensure your Stream API key has the correct domain whitelisted.
- Authentication errors: Check that your user token is valid and matches the user ID.
Use your browser's developer console to debug any issues. Look for errors related to Stream Chat or Video SDK.
Key Takeaways
In this guide, we've covered:
- Setting up an Angular project with Stream Chat and Video SDKs
- Configuring the chat functionality with channels and messages
- Implementing video calling with camera and microphone controls
- Integrating both chat and video calling in a single interface
By using Stream's SDKs, we've significantly reduced the development time and complexity compared to building everything from scratch. The app is also ready to scale to millions of users without additional backend work.
Conclusion
Congratulations! You've successfully built a full-featured Angular video chat app. This is just the beginning – you can enhance it further by adding:
- Screen sharing
- Group video calls
- Custom UI themes
- Message reactions and threads
- Push notifications
Explore the
Stream Chat documentation
andStream Video documentation
to learn more about advanced features and customization options.Ready to take your communication app to the next level? Sign up for a
free Stream trial
and get 10,000 free MAUs to start.FAQ