How to Build an Interactive Live Streaming Application with React: A Comprehensive Guide
Learn how to build an interactive live streaming application using React and VideoSDK. This comprehensive guide covers component structure, implementing host and viewer screens, and adding interactive features like chat, polls, and reactions.
Interactive live streaming has revolutionized digital engagement, with video consumption rising 47% in the past year. While traditional streaming offers one-way communication, interactive streaming creates dynamic, two-way experiences that boost audience retention and provide new monetization opportunities.
However, building robust interactive live streaming applications requires expertise in video processing, real-time communication, and user experience design. React's component-based architecture, efficient rendering, and rich ecosystem make it an ideal framework for tackling these challenges.
This guide will walk you through creating a complete interactive live streaming application with React and VideoSDK.
What Makes React Ideal for Live Streaming Applications?
React offers several advantages for building live streaming applications:
- Component-Based Structure: Create reusable UI components for video players, chat interfaces, and control panels
- Virtual DOM: Ensure smooth performance with real-time updates
- Rich Ecosystem: Access libraries specifically designed for media streaming
- Declarative Approach: Simplify management of complex state changes
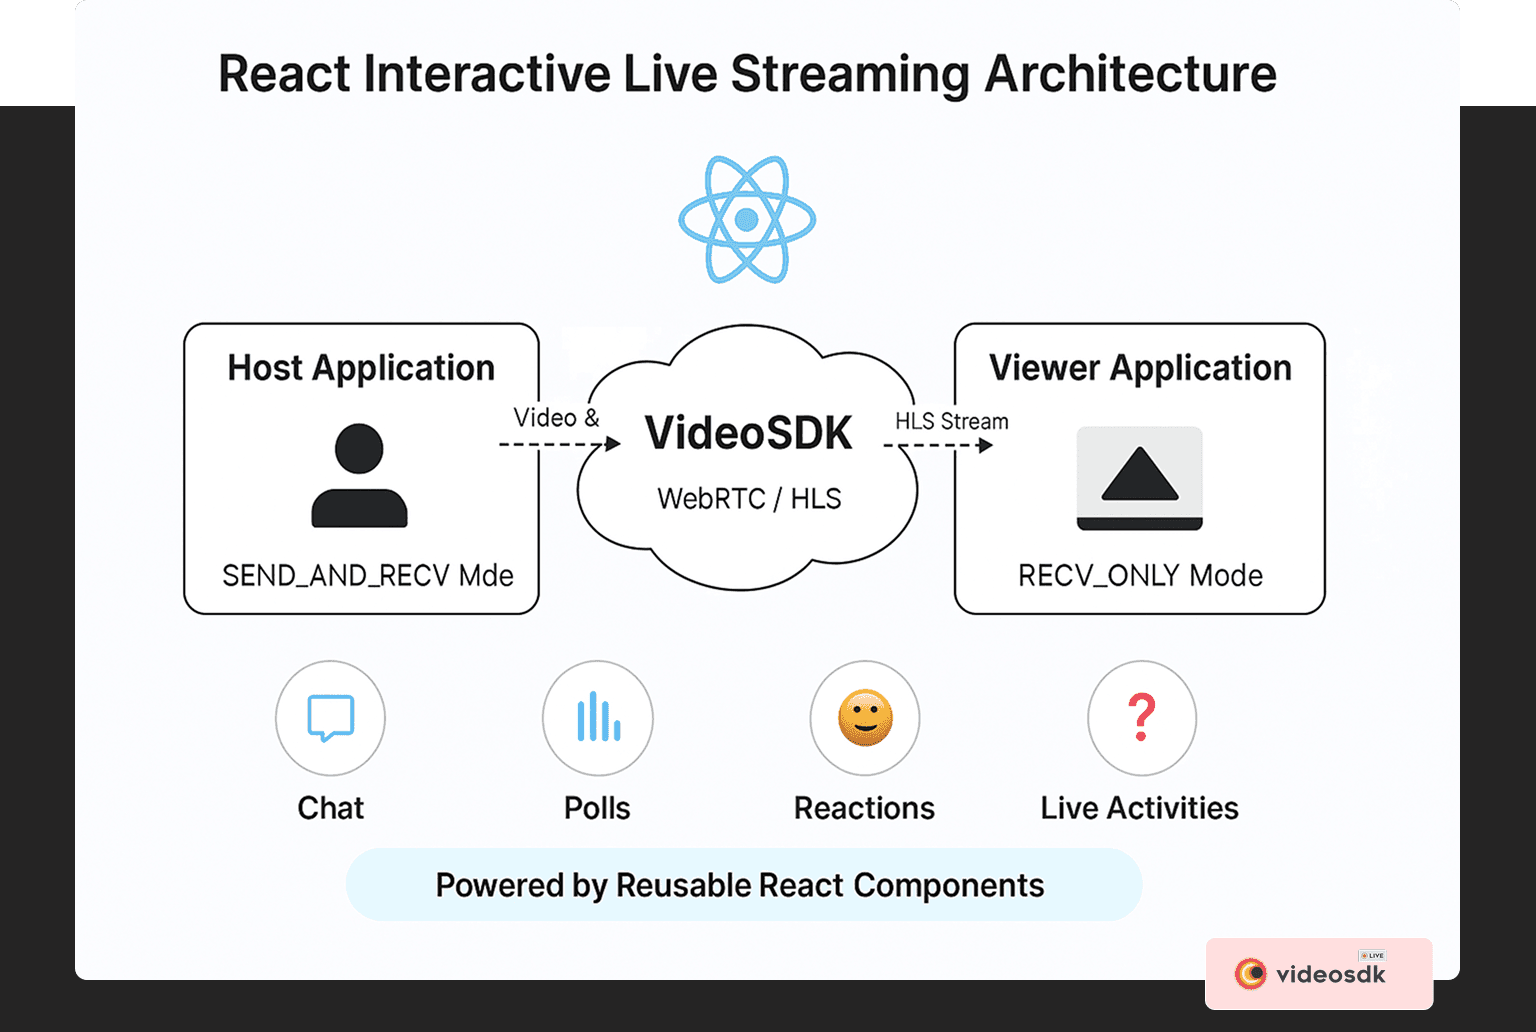
The following diagram illustrates the architecture of a React-based interactive live streaming application, showing how hosts and viewers connect through VideoSDK:
Planning Your Interactive Live Streaming Application
Before writing code, identify your application's key elements:
User Roles
Understanding the different user roles in your live streaming application is crucial for designing the right experience for each participant type:
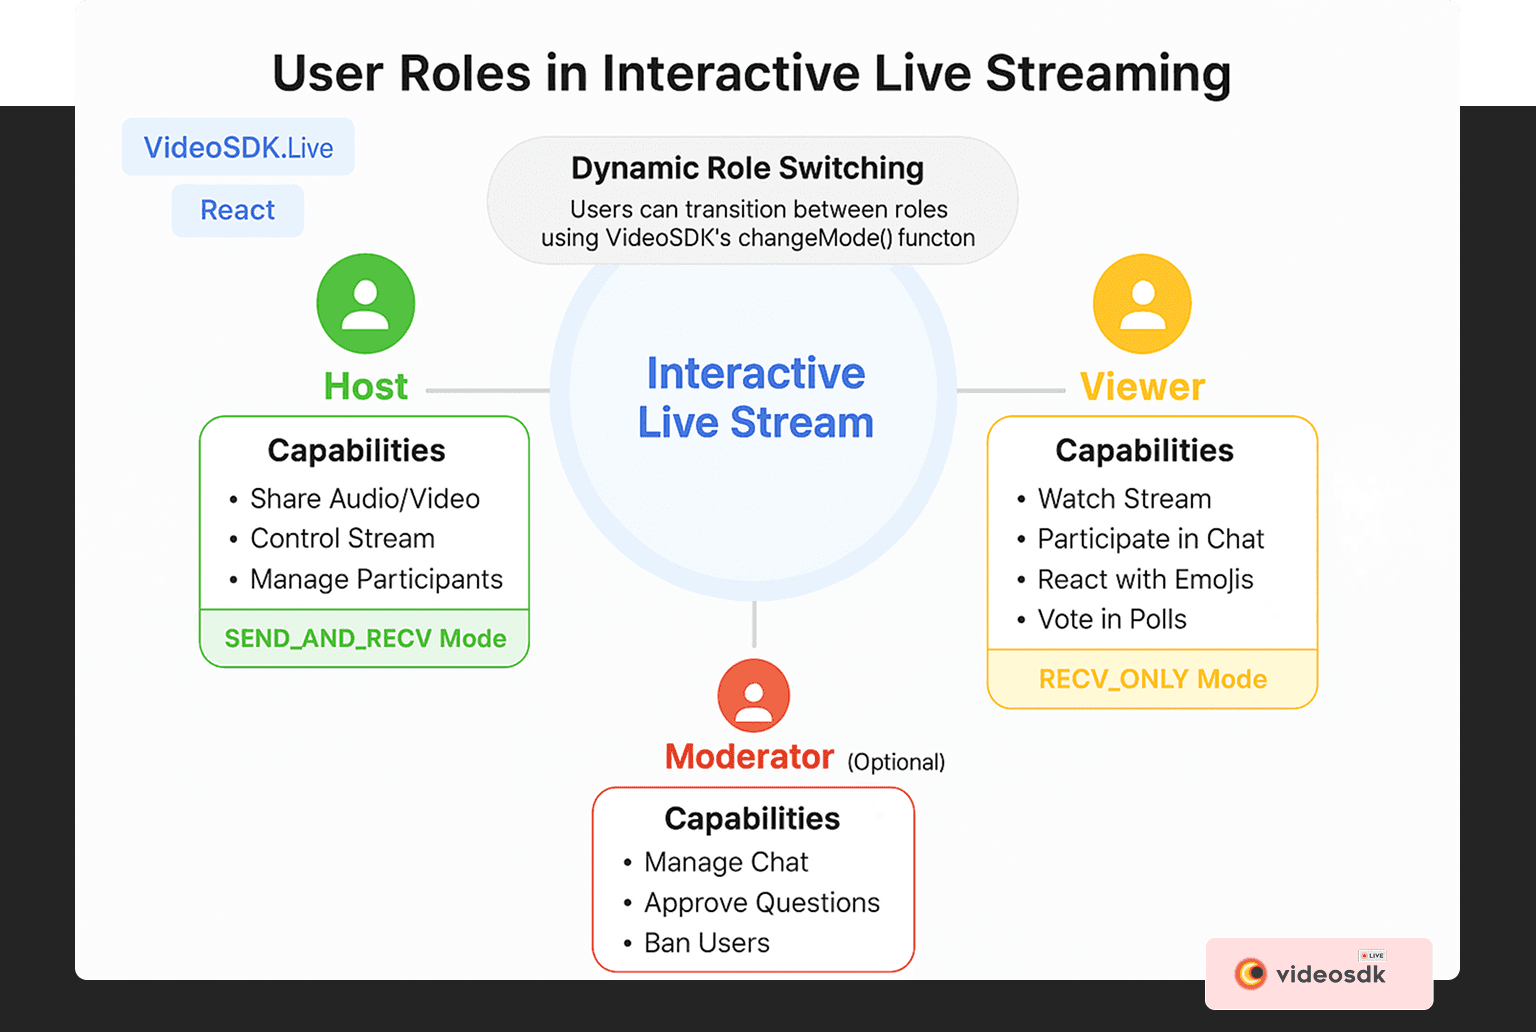
As shown in the diagram above, our application will support three primary roles:
- Speakers/Hosts: Users who broadcast audio/video and control the stream (SENDANDRECV mode)
- Viewers: Users who watch the stream and participate through interactive features (RECV_ONLY mode)
- Moderators (optional): Users who can manage chat and interactive elements
Key Features
- Real-time video and audio streaming
- Chat functionality
- Interactive elements (polls, Q&A, reactions)
- Media controls (camera/microphone toggle)
- User authentication (optional)
Setting Up Your Development Environment
Let's start by creating a new React application and installing the necessary dependencies:
1# Create a new React application
2npx create-react-app videosdk-live-streaming-app
3
4# Install required packages
5npm install @videosdk.live/react-sdk react-player hls.js
6
Project Structure
For a clean, maintainable codebase, organize your project with a logical component hierarchy:

As shown in the hierarchy diagram, our project will be structured as follows:
1src/
2├── screens/
3│   ├── WelcomeScreen.js
4│   ├── SpeakerScreen/
5│   │   ├── MediaControls.js
6│   │   ├── ParticipantsGrid.js
7│   │   └── SpeakerScreen.js
8│   └── ViewerScreen.js
9├── components/
10│   ├── Chat.js
11│   ├── Polls.js
12│   └── Reactions.js
13├── api.js
14└── App.js
15
Implementing Core Functionality
API Configuration
First, set up the VideoSDK authentication and room creation:
1// api.js
2export const authToken = "YOUR_VIDEOSDK_TOKEN";
3
4export const createNewRoom = async () => {
5  const res = await fetch(`https://api.videosdk.live/v2/rooms`, {
6    method: "POST",
7    headers: {
8      authorization: authToken,
9      "Content-Type": "application/json",
10    },
11  });
12
13  const { roomId } = await res.json();
14  return roomId;
15};
16
Welcome Screen
This screen lets users create or join streams:
1// WelcomeScreen.js
2import React, { useState } from "react";
3import { createNewRoom } from "../api";
4
5function WelcomeScreen({ setAppData }) {
6  const [meetingId, setMeetingId] = useState("");
7
8  const createStream = async () => {
9    const roomId = await createNewRoom();
10    setAppData({ mode: "CONFERENCE", meetingId: roomId });
11  };
12
13  return (
14    <div className="welcome-screen">
15      <h1>Interactive Live Streaming</h1>
16
17      <button onClick={createStream}>
18        Create New Stream
19      </button>
20
21      <div className="divider">OR</div>
22
23      <input
24        placeholder="Enter Stream ID"
25        value={meetingId}
26        onChange={(e) => setMeetingId(e.target.value)}
27      />
28
29      <div className="buttons">
30        <button onClick={() => setAppData({ mode: "CONFERENCE", meetingId })}>
31          Join as Host
32        </button>
33
34        <button onClick={() => setAppData({ mode: "VIEWER", meetingId })}>
35          Join as Viewer
36        </button>
37      </div>
38    </div>
39  );
40}
41
Main App Component
The App component manages application state and renders the appropriate screen:
1// App.js
2import React, { useState } from "react";
3import SpeakerScreen from "./screens/SpeakerScreen/SpeakerScreen";
4import ViewerScreen from "./screens/ViewerScreen";
5import WelcomeScreen from "./screens/WelcomeScreen";
6
7function App() {
8  const [appData, setAppData] = useState({ meetingId: null, mode: null });
9
10  // Render different screens based on app state
11  if (!appData.meetingId) {
12    return <WelcomeScreen setAppData={setAppData} />;
13  }
14
15  return appData.mode === "CONFERENCE"
16    ? <SpeakerScreen meetingId={appData.meetingId} />
17    : <ViewerScreen meetingId={appData.meetingId} />;
18}
19
Speaker Screen Implementation
The speaker screen consists of:
- A container to initialize VideoSDK
- Media controls for audio, video, and streaming
- A grid to display participants
1// SpeakerScreen.js
2import { MeetingProvider } from "@videosdk.live/react-sdk";
3import React from "react";
4import MediaControls from "./MediaControls";
5import ParticipantsGrid from "./ParticipantsGrid";
6import { authToken } from "../../api";
7
8function SpeakerScreen({ meetingId }) {
9  return (
10    <MeetingProvider
11      token={authToken}
12      config={{
13        meetingId,
14        name: "Host",
15        micEnabled: true,
16        webcamEnabled: true,
17      }}
18      joinWithoutUserInteraction
19    >
20      <div className="speaker-screen">
21        <MediaControls />
22        <ParticipantsGrid />
23      </div>
24    </MeetingProvider>
25  );
26}
27
The media controls component manages audio, video, and HLS streaming:
1// MediaControls.js
2import { useMeeting, Constants } from "@videosdk.live/react-sdk";
3import React, { useMemo } from "react";
4
5function MediaControls() {
6  const { toggleMic, toggleWebcam, startHls, stopHls, hlsState } = useMeeting();
7
8  // Determine HLS state
9  const { isHlsStarted, isHlsStopped } = useMemo(() => ({
10    isHlsStarted: hlsState === Constants.hlsEvents.HLS_STARTED,
11    isHlsStopped: hlsState === Constants.hlsEvents.HLS_STOPPED,
12  }), [hlsState]);
13
14  // Toggle HLS streaming
15  const toggleHls = () => {
16    if (isHlsStarted) {
17      stopHls();
18    } else if (isHlsStopped) {
19      startHls({ quality: "high" });
20    }
21  };
22
23  return (
24    <div className="controls">
25      <div className="stream-info">
26        <p>Stream Status: {hlsState}</p>
27      </div>
28
29      <div className="buttons">
30        <button onClick={toggleMic}>Toggle Mic</button>
31        <button onClick={toggleWebcam}>Toggle Camera</button>
32        <button onClick={toggleHls}>
33          {isHlsStarted ? "Stop Stream" : "Start Stream"}
34        </button>
35      </div>
36    </div>
37  );
38}
39
The participants grid displays all connected users:
1// ParticipantsGrid.js
2import { useMeeting } from "@videosdk.live/react-sdk";
3import React, { useMemo } from "react";
4import Participant from "./Participant";
5
6function ParticipantsGrid() {
7  const { participants } = useMeeting();
8
9  // Get list of participant IDs
10  const participantIds = useMemo(() =>
11    [...participants.keys()], [participants]
12  );
13
14  return (
15    <div className="participants-grid">
16      {participantIds.map(participantId => (
17        <Participant
18          key={participantId}
19          participantId={participantId}
20        />
21      ))}
22    </div>
23  );
24}
25
Viewer Screen Implementation
The viewer screen shows the HLS stream once the speaker starts broadcasting:
1// ViewerScreen.js
2import { MeetingProvider, MeetingConsumer, Constants } from "@videosdk.live/react-sdk";
3import React, { useEffect, useRef } from "react";
4import Hls from "hls.js";
5import { authToken } from "../api";
6
7function HLSPlayer({ playbackUrl }) {
8  const videoRef = useRef(null);
9
10  useEffect(() => {
11    if (playbackUrl && Hls.isSupported()) {
12      const hls = new Hls({
13        capLevelToPlayerSize: true,
14        maxLoadingDelay: 4,
15        minAutoBitrate: 0,
16      });
17
18      hls.loadSource(playbackUrl);
19      hls.attachMedia(videoRef.current);
20    }
21  }, [playbackUrl]);
22
23  return (
24    <video
25      ref={videoRef}
26      autoPlay
27      controls
28      className="hls-player"
29    />
30  );
31}
32
33function ViewerScreen({ meetingId }) {
34  return (
35    <MeetingProvider
36      token={authToken}
37      config={{
38        meetingId,
39        name: "Viewer",
40        mode: "VIEWER"
41      }}
42      joinWithoutUserInteraction
43    >
44      <MeetingConsumer>
45        {({ hlsState, hlsUrls }) =>
46          hlsState === Constants.hlsEvents.HLS_PLAYABLE ? (
47            <HLSPlayer playbackUrl={hlsUrls.playbackHlsUrl} />
48          ) : (
49            <div className="waiting">
50              <p>Waiting for the host to start streaming...</p>
51            </div>
52          )
53        }
54      </MeetingConsumer>
55    </MeetingProvider>
56  );
57}
58
Adding Interactive Features
Now, let's add key interactive features to enhance engagement.
Chat Component
Implement real-time chat using VideoSDK's PubSub:
1// Chat.js
2import React, { useState, useEffect } from "react";
3import { usePubSub } from "@videosdk.live/react-sdk";
4
5function Chat() {
6  const [messages, setMessages] = useState([]);
7  const [messageText, setMessageText] = useState("");
8  const { publish, messages: pubSubMessages } = usePubSub("CHAT");
9
10  useEffect(() => {
11    if (pubSubMessages) {
12      // Format and set messages
13      const formattedMessages = pubSubMessages.map(msg => ({
14        text: msg.message,
15        sender: msg.senderName,
16        timestamp: msg.timestamp
17      }));
18
19      setMessages(formattedMessages);
20    }
21  }, [pubSubMessages]);
22
23  const sendMessage = () => {
24    if (messageText.trim()) {
25      publish(messageText, { persist: true });
26      setMessageText("");
27    }
28  };
29
30  return (
31    <div className="chat">
32      <div className="messages">
33        {messages.map((msg, index) => (
34          <div key={index} className="message">
35            <span className="sender">{msg.sender}</span>
36            <p>{msg.text}</p>
37          </div>
38        ))}
39      </div>
40
41      <div className="message-input">
42        <input
43          value={messageText}
44          onChange={(e) => setMessageText(e.target.value)}
45          placeholder="Type your message..."
46          onKeyPress={(e) => e.key === "Enter" && sendMessage()}
47        />
48        <button onClick={sendMessage}>Send</button>
49      </div>
50    </div>
51  );
52}
53
Polls Component
Create interactive polls for audience engagement:
1// Polls.js
2import React, { useState, useEffect } from "react";
3import { usePubSub } from "@videosdk.live/react-sdk";
4
5function Polls() {
6  const [polls, setPolls] = useState([]);
7  const [newPoll, setNewPoll] = useState({ question: "", options: ["", ""] });
8  const { publish, messages } = usePubSub("POLLS");
9
10  useEffect(() => {
11    if (messages) {
12      const pollsData = messages.map(msg => JSON.parse(msg.message));
13      setPolls(pollsData);
14    }
15  }, [messages]);
16
17  const createPoll = () => {
18    // Create and publish poll
19    const poll = {
20      id: Date.now(),
21      question: newPoll.question,
22      options: newPoll.options.map(text => ({ text, votes: 0 })),
23    };
24
25    publish(JSON.stringify(poll), { persist: true });
26
27    // Reset form
28    setNewPoll({ question: "", options: ["", ""] });
29  };
30
31  const vote = (pollId, optionIndex) => {
32    // Handle voting logic
33    const updatedPolls = polls.map(poll => {
34      if (poll.id === pollId) {
35        const newOptions = [...poll.options];
36        newOptions[optionIndex].votes += 1;
37        return { ...poll, options: newOptions };
38      }
39      return poll;
40    });
41
42    // Find and publish updated poll
43    const updatedPoll = updatedPolls.find(p => p.id === pollId);
44    publish(JSON.stringify(updatedPoll), { persist: true });
45  };
46
47  return (
48    <div className="polls">
49      {/* Poll creation form */}
50      <div className="create-poll">
51        <input
52          placeholder="Enter your question"
53          value={newPoll.question}
54          onChange={(e) => setNewPoll({ ...newPoll, question: e.target.value })}
55        />
56
57        {/* Option inputs */}
58        {newPoll.options.map((option, index) => (
59          <input
60            key={index}
61            placeholder={`Option ${index + 1}`}
62            value={option}
63            onChange={(e) => {
64              const newOptions = [...newPoll.options];
65              newOptions[index] = e.target.value;
66              setNewPoll({ ...newPoll, options: newOptions });
67            }}
68          />
69        ))}
70
71        <button onClick={() => setNewPoll({
72          ...newPoll,
73          options: [...newPoll.options, ""]
74        })}>
75          Add Option
76        </button>
77
78        <button onClick={createPoll}>Create Poll</button>
79      </div>
80
81      {/* Polls list */}
82      <div className="polls-list">
83        {polls.map(poll => (
84          <div key={poll.id} className="poll">
85            <h4>{poll.question}</h4>
86
87            {poll.options.map((option, index) => (
88              <div key={index} className="option">
89                <span>{option.text} ({option.votes} votes)</span>
90                <button onClick={() => vote(poll.id, index)}>
91                  Vote
92                </button>
93              </div>
94            ))}
95          </div>
96        ))}
97      </div>
98    </div>
99  );
100}
101
Reactions Component
Add emoji reactions for simple audience participation:
1// Reactions.js
2import React, { useState, useEffect } from "react";
3import { usePubSub } from "@videosdk.live/react-sdk";
4
5const REACTIONS = ["👍", "❤️", "😂", "👏", "🎉"];
6
7function Reactions() {
8  const { publish, messages } = usePubSub("REACTIONS");
9  const [activeReactions, setActiveReactions] = useState([]);
10
11  // Handle sending reactions
12  const sendReaction = (emoji) => {
13    publish(emoji);
14    showReaction(emoji);
15  };
16
17  // Display reaction animation
18  const showReaction = (emoji) => {
19    const newReaction = {
20      id: Date.now(),
21      emoji,
22      position: Math.random() * 80 + 10, // Random position
23    };
24
25    setActiveReactions(prev => [...prev, newReaction]);
26
27    // Remove reaction after animation
28    setTimeout(() => {
29      setActiveReactions(prev =>
30        prev.filter(r => r.id !== newReaction.id)
31      );
32    }, 3000);
33  };
34
35  // Listen for reactions from others
36  useEffect(() => {
37    if (messages && messages.length > 0) {
38      const lastMessage = messages[messages.length - 1];
39      showReaction(lastMessage.message);
40    }
41  }, [messages]);
42
43  return (
44    <div className="reactions">
45      <div className="reaction-buttons">
46        {REACTIONS.map(emoji => (
47          <button
48            key={emoji}
49            onClick={() => sendReaction(emoji)}
50          >
51            {emoji}
52          </button>
53        ))}
54      </div>
55
56      <div className="floating-reactions">
57        {activeReactions.map(reaction => (
58          <div
59            key={reaction.id}
60            className="floating-emoji"
61            style={{ left: `${reaction.position}%` }}
62          >
63            {reaction.emoji}
64          </div>
65        ))}
66      </div>
67    </div>
68  );
69}
70
Integrating Components
To use these interactive features, integrate them into your Speaker and Viewer screens:
1// Enhanced SpeakerScreen.js
2function SpeakerScreen({ meetingId }) {
3  return (
4    <MeetingProvider config={...}>
5      <div className="app-container">
6        <div className="main-content">
7          <MediaControls />
8          <ParticipantsGrid />
9        </div>
10
11        <div className="sidebar">
12          <Chat />
13          <Polls />
14          <Reactions />
15        </div>
16      </div>
17    </MeetingProvider>
18  );
19}
20
21// Enhanced ViewerScreen.js
22function ViewerScreen({ meetingId }) {
23  return (
24    <MeetingProvider config={...}>
25      <div className="app-container">
26        <div className="main-content">
27          <HLSPlayer />
28        </div>
29
30        <div className="sidebar">
31          <Chat />
32          <Polls />
33          <Reactions />
34        </div>
35      </div>
36    </MeetingProvider>
37  );
38}
39
Styling Your Application
Add CSS to create a professional look and feel. Use a design system or create custom styles for your components. Here's a basic styling example for the application container:
1/* App.css */
2.app-container {
3  display: flex;
4  height: 100vh;
5}
6
7.main-content {
8  flex: 1;
9  padding: 20px;
10  background-color: #f8f9fa;
11}
12
13.sidebar {
14  width: 300px;
15  background-color: white;
16  border-left: 1px solid #dee2e6;
17  padding: 20px;
18  overflow-y: auto;
19}
20
21/* Add more styles for other components */
22
Conclusion
Building an interactive live streaming application with React and VideoSDK enables you to create engaging, real-time experiences for your users. By implementing features like chat, polls, and reactions, you can significantly increase audience participation and retention.
This guide has provided a foundation for creating your own interactive streaming application. As you continue development, consider adding features like:
- User authentication
- Screen sharing
- Recording capabilities
- Analytics and monitoring
- Custom branding and themes
With React's component-based architecture and VideoSDK's powerful capabilities, you're well-equipped to build a production-ready interactive live streaming platform that engages your audience and stands out from traditional streaming applications.
FAQ